Adding Archive Tasks
Users with the Change System Settings permission in their Security Profile can add an archive task.
To add an archive task click the ![]() navigation icon and then click the Archive link from the administration sub-menu. The Archive tab displays containing storage locations and archive tasks. To add a new archive task, complete the following steps:
navigation icon and then click the Archive link from the administration sub-menu. The Archive tab displays containing storage locations and archive tasks. To add a new archive task, complete the following steps:
- Click the
 button located at the top of the archive tasks table.
 - A new tab will open with Schedule as the tab title.
- Complete the Archive Settings section:
- Scheduled Archive Name – enter a valid name for the archive task.
- Destination Storage Location – select a destination storage location from the list provided or create a new location if required. See below for more information on Creating a new Destination Storage Location.
- Recording Type – select the type of recordings to archive (call, screen or both).
- Choose one of two methods for selecting users:
All Users - Select this option to have the archive task include recordings from all users that exist in your Quality Management environment each time the archive task runs. This collapses the Users section of the archive.
Select User - Select this option to expand the Users section of the archive. In the Users section you can select from specific users to archive recordings. See below for more information on Selecting Users to Archive.
- Complete the Archive Criteria section.
- Calls Before Date - Select this option to archive recordings that occurred before the selected date. For example, if you select 05/24/2012, then recordings that ended on 5/23/2012 or before will be included in the archive task.
- Oldest X Days - Select this option to archive the oldest X days of recordings. For example, if you enter 2 days and the earliest recording on the selected source location is 07/05/2012, then only recordings from 07/05/2012 - 07/06/2012 will be included in the archive task.
- All But Newest Days - Select this option to archive all but the newest X days of recordings. For example, if you enter 3 days and the newest recording on the selection source location is 03/21/2012, then recordings from 03/18/2012 and older will be included in the archive task.
- Archive Oldest X Amount of Data - Select this option to archive the oldest X amount of data. When selecting this option you can choose between measuring data in MB or GB using the dropdown box. For example, if you enter 100 and select MB, the oldest 100MB worth of recordings will be included in the archive box.
- Complete the Schedule section.
- Now - Select this option to initiate the archive task as soon as you click Save
- Once on date/time - Select this option to initiate the archive task at a predefined date and time in the future. The date and time must be at least one hour in the future.
- Recurring every - Select this option for the archive to occur and select the time to start the archive on the selected days of the week.
- Select one or more Archive Source Locations to archive. Source locations only appear in the list if the location contains recordings. Only locations selected will have recordings included in the archive task. Also, when using the Oldest X days and All but Newest X Days archive criteria the dates are calculated using the newest and oldest recordings that exist on the selected source locations.
|
|
When you add a new Data Collector to your Quality Management environment or change the local storage location of any Quality Management Server, update the source location list of any archive task that you want to include in the new source location. |

- Click the Save button on the action bar located at the top right of the archive task tab. The tab will refresh and the archive task name will now display as the tab title.
Creating a new Destination Storage Location
To add a new archive destination location, complete the following steps.
- Click the
 button. A dialog box displays prompting you to enter the required information to create a new location.
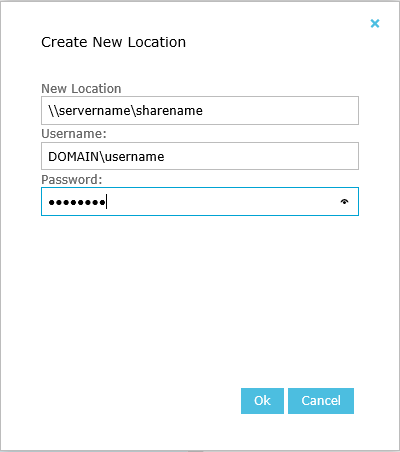
- New Location - The UNC path to the new storage location. For example: \\MachineName\Folder.
- Username - The username used to gain access to the new storage location. Username should be entered as Domain\Username or WorkgroupMachineName\Username.
- Password - The password used to gain access to the new storage location.
- Click the Ok button. The Destination Storage Location select box will update with the new location.
Selecting Users to Archive
When using the Select Users option you can choose from one or many users to archive. Only recordings associated with the selected users will be included in the archive task. You can also filter the displayed list of users using the following criteria:
- Department - Only users from the selected department display
- Location - Only users from the selected location display
- Status - Only users that have the selected status display. Choices include:
- Active
- Inactive
- All
See also: