Adding Text Recording Profiles
Users with the Administer Recording Profiles permission in their Security Profile can add a text recording profile.
To add a text recording profile click the ![]() navigation icon and then click the Text Recording Profiles link from the administration sub-menu. The Text Recording Profiles tab displays containing the list of text recording profiles. To add a text recording profile, complete the following steps:
navigation icon and then click the Text Recording Profiles link from the administration sub-menu. The Text Recording Profiles tab displays containing the list of text recording profiles. To add a text recording profile, complete the following steps:
- Click the
 button on the action bar located at the top right of the text recording profile table.
 - A new tab will open with New Text Recording Profile as the tab title.
- Enter a valid Profile Name.
- Specify the Media Type the profile applies to.
- Specify the Text Recording Profile Rules. A text recording Profile can be configured to record or not record calls not explicitly treated by a custom rule using the Record any calls not explicitly treated by a custom rule check box.
If a recording does not meet the criteria of any of the rules in a text recording profile's set of rules, it will only be recorded if the check box is selected.
- The informational element to compare can be set to Keyword, From Address or To Address.
- The relationship to the pattern can be set to Is equal to, Is not equal to, or Matches regular expression.
- The pattern names an alphanumeric string that may include one or more wildcard (*) characters if the relationship has been specified as equal or not equal to. If the relationship has been specified as matches a regular expression, the pattern is the regular expression to match that satisfies the rule. A Regular Expression is a sequence of characters that describes a search pattern using a formal language. An example of a simple regular expression is ^\d{4}$, this expression matches a pattern where there are exactly four digits at the start of the informational element and nothing after those four digits. Further examples of Regular Expressions can be found on the internet.
- The recording behavior can be set to Message is recorded or Message is not recorded.
- Specify the Message Retention Settings. Select Automatically delete messages older than [ ] days and enter a value to delete recordings older than the specified number of days. The recordings are deleted 24 hours after you define this value. If you enter 0, calls are retained indefinitely.
|
|
Recording retention settings can still be overridden for specific recordings. See Override Recording Retention Settings. |
- Specify the Text Recording Schedule. To define a schedule, complete the following steps.
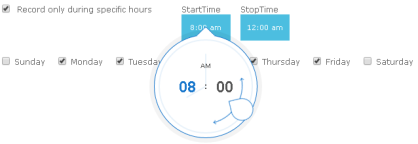
- Select the Record only during specific hours check box.
- Set the Start Time and Stop Time using the “time dropper” control. Move the teardrop around the circle to increase/decrease the time. Click on the minute value to switch to incrementing by minutes and vice versa by clicking on the hour value.
- Select each day of the week on which to record messages. If you do not select any of the check boxes no calls are recorded.
- Click the Save button on the action bar located at the top right of the screen recording profiles tab. The tab will refresh and the screen recording profile name will now display as the tab title.
See Also:
Viewing Text Recording Profiles
Editing Text Recording Profiles
Deleting Text Recording Profiles