Active Directory Import
If a Quality Management server is joined to a domain, Quality Management users can be imported directly from the Active Directory Store.
Users with the Add/Edit Users permission in their Security Profile can import users from Active Directory.
To import users from Active Directory click the ![]() navigation icon and then click the Active Directory Import link from the administration sub-menu. The Active Directory Import tab displays containing the Active Directory Search panel, the Import Options panel and an Import Targets table.
navigation icon and then click the Active Directory Import link from the administration sub-menu. The Active Directory Import tab displays containing the Active Directory Search panel, the Import Options panel and an Import Targets table.
To import users from Active Directory, complete the following steps:
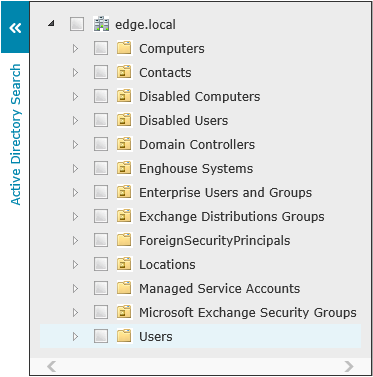
- Browse the Active Directory structure in the left most pane and select the box next to any users you want to import. Click the triangle to expand the Active Directory node. The triangle disappears when a node with no children is expanded. A user selected in the Active Directory browser appears in the import targets table. If you select or clear a container object in the Active Directory browser, then it causes all the contained users to be selected or cleared.
- In the Import Options section, configure the attributes you want to be applied to all the users in the Import Target table.
- Configure the administrative attributes under the Import Options heading:
- Department. The department in which the user works. Specifying a department will make it easier to find a user later.
- Location. The user's physical location. Specifying a location will make it easier to find a user later.
- Security Profile. This determines the Quality Management functionality the users can use. This is a mandatory field, select one of the existing profiles.
- Account State. The state of the newly created User accounts. Select Active, which is the default setting, to enable users to log into the Quality Management Client and for their calls to be recorded. Apart from being Active, a user should also have an Enghouse Interactive Call Recording license. Select Inactive to inactivate the user; the Quality Management Client retains the user's details and call data, but the user cannot log into the Quality Management Client or have their calls recorded.
- Configure the License Types attribute:
|
|
The availability of a given license type requires that the server be provisioned with that license type and that there is at least one unused license of that type. |

Call Recording. Select this check box to assign an Unlimited Call Recording license to all the users in the Import Target group. Users with this type of Call Recording license are automatically assigned to the default Call Recording Profile so that their calls are automatically recorded. This profile can be overridden by selecting a different Call Recording Profile for the group of users.
Concurrent Call Recording – Select this check box to assign a Concurrent Call Recording license to all the users in the Import Target group. This is a per-seat license for system-managed recording of calls based on settings in Call Recording Profiles.
On-Demand Call Recording. Select this check box to assign an On-demand Call Recording license to all the users in the Import Target group. Users with this type of Call Recording license can only have their calls recorded in real-time (as they happen). They cannot be assigned to a Call Recording Profile and they cannot have their calls recorded automatically.
Screen Recording. Select this check box to assign a Screen Recording license to all the users in the Import Target group.
Concurrent Screen Recording – Select this check box to assign a Concurrent Screen Recording license to all the users in the Import Target group. This is a per-seat license for system-managed recording of either full user desktops or specific desktop applications, based on Screen Recording Profiles. A Concurrent Call Recording license is required for each Concurrent Screen Recording license.
Agent Evaluation. Select this check box to assign an agent evaluation license to all the users in the Import Target group.
Supervisor – Select this check box to assign a Supervisor license to all the users in the Import Target group. This is a per-user license granting a user access to log into the QMS Client and perform whatever functions are allowed through the user’s Security Profile, but does not allow the user to have calls recorded.
Desktop Utility – Select this check box to assign a Desktop Utility license to all the users in the Import Target group. This is a per-user license that allows use of the QMS Desktop Utility by the user to start, stop, and pause call recordings, without having to log into the QMS Client.
Voice Analytics Realtime - Select this check box to assign a Voice Analytics Realtime license to all the users in the Import Target group. This is a per-user license granting a user access to the live streaming VocalCoach Application. This license also functions as a “base” license where the user can have the license without requiring any other licenses
Voice Analytics Batch - Select this check box to assign a Voice Analytics Batch license to all the users in the Import Target group. This is a per-user license granting a user access VocalCoach’s Batch Speech Processing Application. This license has a pre-requisite of a call recording license: Either Call Recording, Concurrent Call Recording, On-Demand Call Recording, or Voice Analytics Realtime.
- Configure the Call Recording Settings section (available only if users are optioned with one of the Call Recording license types):
- Recording Server. The name of the network device hosting the Call Recording service where all the users in the Import Target group will be recorded. This is a mandatory field, select one of the existing servers. In the case of a High Availability environment, this will be the High Availability Node Name.
- Recording Profile. The name of the Recording Profile that all the users in the Import Target group will be assigned to. This is only available if the users are optioned with a Call Recording license. If no selection is made, then all users in the Import Target group will be assigned to the default Call Recording Profile.
- Privacy Enabled. Select this check box to prevent all the users in the Import Target group from being recorded, even if engaged in a call with another user that is being recorded.
- Lookback Recording Enabled. Select this check box for all the users in the Import Target group to be able to start recording at any time during a call and still record the entire call.
- Use only last [] digits of listed extension. Select this check box to import only the last n digits of the telephone extension from the Active Directory Store for each user in the Import Target group. The extension to be imported is updated in the table display of each user's details as these parameters are changed.
- Use Telephone/Use SIP line/Prefer Tele over SIP/Prefer SIP over Tele. These four check boxes are only available if the selected Recording Server is a Microsoft Lync based PBX. Select Use Telephone to always populate the extension for imported users from the telephone attribute in Active Directory. Select Use SIP Line to always populate the extension for imported users from the telephone attribute in the Lync database. Select Prefer Telephone over SIP Line to use the telephone attribute in Active Directory if it is set, otherwise it will use the telephone attribute in the Lync database. Select Prefer SIP Line over telephone to use the telephone attribute in Active Directory. The extension to be imported is updated in the table display of each user's details as extension source is changed.
- Configure the Screen Recording Settings section (available only if users are optioned with an Enghouse Interactive Screen Recording license):
- Recording Profile. The name of the Screen Recording Profile that all the users are assigned. If no selection is made, then all users in the Import Target group will be assigned to the default Screen Recording Profile.
- Edit any missing or invalid data in the table displaying the details for each user in the import target group. Any data member imported on a per user basis can be edited in the table. All data members are required for each user. Any user whose data is incomplete is highlighted in red and the missing or invalid data member is outlined.
TipHover over the highlighted data member to display a detail of the issue.
- Configure Per Imported User Data Members attribute:
- Status. This is not a data member that can be edited. It displays the import status of a user in the Import Target group. Statuses are selected for import, successfully imported and failed import.
- First Name. The first name of the user.
- Last Name. The last name of the user.
- Username. The username used by the user to log into Quality Management Client. The member should consists of alphanumeric characters only.
- Password. The password used by the user to log into Quality Management Client. The member should consists of alphanumeric characters only.
- Extension. The user's primary recorded telephone extension. This member is only visible if the users in the Import Target group have been optioned with one of the Call Recording license types. The member should consist of numeric characters only.
- Windows Login. The user's Windows login in domain\Username format.
- Endpoint IP Address. The IP address of the user's phone. This member is only visible if the users in the Import Target group have been optioned with one of the Call Recording license types. The member should contain a valid IP address or "0.0.0.0".
- SIP URL. The SIP URI associated with the user. This member is only visible if the users in the Import Target group are being associated with a Lync based Recording Service. The SIP URI should be specified as sip:<name>@<address>
TipHovering over the status will display a text representation of the state and any error condition resulting in a failed import.
- Edit any conflicted data in the table displaying the details for each user in the Import Target group. The majority of members need to have unique values when compared to other users in the Import Target group. Two or more imported users cannot have the same username, extension, Windows login, Endpoint IP Address (if not 0.0.0.0) or SIP URI. Conflicting rows are highlighted in red and the conflicting data member is outlined.
- Click the Import button located above the import targets table. Each user in the Import Target group is created as a Quality Management Client user. The status member associated with each user is updated to reflect the result of each individual user import.
TipHover over the conflicted data member to display a detail of the issue.
Using a Windows Authentication as Client Login