Listing Recorded Calls
To list recorded calls click the navigation icon. The Recordings tab displays containing the search criteria bar and the search results table. To perform a search complete the following steps:
- Define the search criteria.
- Click the Search button. The
 call recordings satisfying the search criteria are listed.
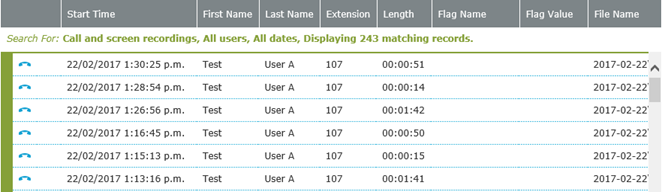
The Search results table displays containing the following data columns:
|
Column |
Description |
|
Media |
One of two icons indicating whether the recording is a |
|
Chain |
The |
|
Start Time |
The date and time at which the call started. The date displayed depends on your preferences for time zone display. |
|
First Name |
The user's first name. |
|
Last Name |
The user's last name. |
|
Extension |
The user's extension number. |
| Computer Name | The machine name of the user’s computer. |
|
Caller ID # |
The caller ID number, used to trigger call recording. |
|
Caller ID Name |
The caller ID name, used to trigger call recording. |
|
DNIS |
The DNIS. This is typically the number dialled by the caller, but sometimes, depending on the PBX, it is a route-point identifier instead. For example, an external phone number might reach an internal route-point extension 1111, which the contact center application knows routes to a group of agents. In that case, 1111 might be displayed. |
|
Outbound # |
The number dialed by the user. |
|
Length |
The duration of the call. |
|
End Time |
The date and time at which the call ended. The date displayed depends on your preferences for time zone display. |
|
Flag Name |
The name of the flag applied to the call. |
|
Flag Value |
The value of the flag applied to the call. |
|
File Location |
The path to the daily call record subfolders. |
|
File Name |
The name of the subfolder and file containing the call record. |
|
Call ID* |
A PBX-specific call identifier. |
|
Recorded By |
"System" if the call is recorded automatically (according to a profile); otherwise, the user name for user-initiated recordings. |
| Department | The department of the user |
| Location | The location of the user |
| Time zone | The time zone offset to UTC of the recording server where the recording was made. |
| System Flags | Any system flag can also be selected and viewed as a column |
* What is actually displayed depends on the data output by your PBX.
|
|
You can hide or display columns in the search results table by clicking the |
Click on a search result to select it. You can click and drag to select multiple results. Left click on a selected search result to bring up the context menu:

The search results context menu contains the following commands:
- Preview the selected recording (call recordings only). See below.
- Details to play the recording or view and edit any flags or notes applied to the call record.
- Export Media to copy the call audio to an OPUS or MP3 file on your computer.
- Start Evaluation to create a new evaluation using the recording.
- Reject to mark the recording as not suitable for evaluations.
- Delete to permanently delete the recording.
|
|
The Start Evaluation and Reject commands are only available to users licensed to perform Agent Evaluations. |
Preview Call Recordings
You can now preview the selected call recording from within the search results table to listen to the audio without having to open the recording into a new tab. Select the Preview option from the context menu and the preview player will show and play the selected call recording. Preview does not apply to screen recordings.

While the preview is playing you can click the Pause button on the context menu to pause the playback. Clicking anywhere on the audio waveform will also move the play head forward to that position.
Defining Recording Search Criteria
Restricting a User's Recording View based on Flags