Adding Screen Recording Profiles
Users with the Administer Recording Profiles permission in their Security Profile can add screen recording profiles.
To add a screen recording profile click the ![]() navigation icon and then click the Screen Recording Profiles link from the administration sub-menu. The Screen Recording Profiles tab displays containing the list of screen recording profiles. To add a screen recording profile, complete the following steps:
navigation icon and then click the Screen Recording Profiles link from the administration sub-menu. The Screen Recording Profiles tab displays containing the list of screen recording profiles. To add a screen recording profile, complete the following steps:
- Click the
 button on the action bar located at the top right of the screen recording profile table.
 - A new tab will open with New Screen Recording Profile as the tab title.
- Enter a valid Profile Name.
- Specify the Profile Settings. Select each parameter you want to apply, and then enter a value:

- Stop recording when less than [ ] percent of users' disk capacity remains.
Screen recordings are stored on the User's computer. Use this parameter to prevent the screen recordings from filling the User's computer hard disk. The default value is 10%. Enter a new value or use the arrow buttons to increment or decrement the displayed value.
- Limit file upload bandwidth to [ ] Kbps. (Remote/VPN users).
Uploading a screen recording uses significant network bandwidth. If remote Users have a limited bandwidth, uploading files may reduce the performance of their computers (for example, if they are using a soft-phone). Use this parameter to limit the data transfer rate and so reduce the bandwidth consumed. Select from 32, 64, 128, or 252 Kbps.
- Delete screen recordings after [ ] days.
Enter a value to delete screen recordings older than the specified number of days. If you enter 0, screen recordings are retained indefinitely.
- Specify the Full Screen Recording Options. Click one of the following options:

- Call Triggered Record Full Screen
Call triggered screen recording will record the user’s computer screen while they are on a call.
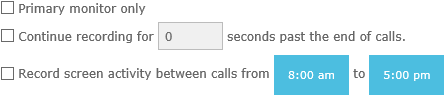
If you choose this option you can also click Primary monitor only to specify that only the main monitor in a multi-monitor setup should be used.
You can also choose to Continue recording for [] of seconds past the end of calls to extend the recording after the call finished.
Another option is to Record screen activity between calls from [] to [] daily. If you want to record user computer activity even when they are not engaged in a call, specify the time interval during which this is to happen.
- Web Chat Triggered Record Full Screen

Web Chat triggered screen recording will record the user’s computer screen when directed to by an API call to the QMS services.
If you choose this option you can also click Primary monitor only to specify that only the main monitor in a multi-monitor setup should be used.
- UC Message Triggered Screen Recording
UC Message triggered screen recording will record the user’s computer screen while they are participating is a Skype for Business chat session.
If you choose this option you can also click Primary monitor only to specify that only the main monitor in a multi-monitor setup should be used.
- Specify the Application Recording Options (if applicable):
- Click the Save button on the action bar located at the top right of the screen recording profiles tab. The tab will refresh and the screen recording profile name will now display as the tab title.
If you choose application recording, then you can enter the names of the processes they would like to monitor.
When recording configured applications, only the active application (the application that currently has focus) will be recorded. When an application window loses focus the recording pauses. For example, you are working in Notepad, which is being recorded, and you open Internet Explorer to do a search. When you open Internet Explorer Notepad loses focus and the recording pauses.
An application recording also pauses if a recorded application is minimized. If an application is paused for more than five minutes, the recording will end and a new recording will begin once the application has regained focus or is restored from being minimized.
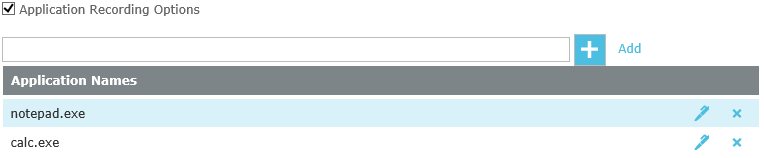
Add the executable name of the application you want to record in the input box provided and click the ![]() Add button.
Add button.
See Also:
Editing Screen Recording Profiles