Adding Tenants
Users with the Manage Tenants permission in their Security Profile and a member of the Provider tenant can create new tenants.
To add a tenant click the ![]() navigation icon and then click the Tenants link from the administration sub-menu. The Tenants tab displays containing configured alerts that the user can see. To create a new tenant, complete the following steps:
navigation icon and then click the Tenants link from the administration sub-menu. The Tenants tab displays containing configured alerts that the user can see. To create a new tenant, complete the following steps:
-
Click the
 button located at the top of the Tenant table.
 -
A Tenant Name is required. Only alphanumeric characters are valid in this field.
-
A Local Storage Folder is required. Each tenant’s recordings are segregated into a separate folder in the local storage directory of a Recording or Media Processing service. This folder name must be unique across all tenants.
-
Status – Active or Inactive. Inactive tenants cannot be logged into until made active.
-
Tenant License Allocation. Allocate licenses to this tenant from your system license pool. As you assign licenses the remaining license count will decrease.
-
Tenant Virtual Host Name. The name of the virtual application in the IIS Manager. This will be used to give each tenant specific client URL. This allows tenant identification prior to login. IIS settings will automatically be completed once this information is added.
-
Enable Windows Authentication. This enables each Tenant to specify using Windows Authentication independently from other Tenants.
-
Enable Third-Party Authentication. This enables each Tenant to specify using Third-Party Authentication independently from other Tenants. It also will require additional fields to be specified. See the section below for Third-Party Authentication Settings for Tenants.
-
Tenant Retention Settings. This controls the retention settings for recordings by profile. Setting the maximum retention values for a tenant will result in the tenant not being able to override the target retention settings with values greater than the maximums set here.
-
Tenant Services Assignment. You can change/restrict which QMS services are available to this tenant. For example if you have more than one recording service, you can choose to restrict the services that the tenant users are able to be housed on.
-
Recording Service Settings Any recording service selected which has tenant specific configuration will be listed here. If the recording service does not have tenant specific settings, the message "There are no tenant specific settings for this recording server".
-
Currently the only PBX to have tenant specific settings is Cisco Webex. Please refer to the Cisco Webex Integration documentation for information on configuring these fields.
-
Transcription Engine Settings
Enable Transcription – check this box to enable and configure a transcription engine.
Transcription Engine Type – select the type of transcription service to use from the drop-down list. One of three types of transcription service may be selected:
- Amazon Transcribe
- Microsoft Azure Speech-to-Text
- Enghouse Transcription
Transcription Server List – The list of transcription servers is dependent on the selected Transcription Engine Type. The add/edit dialog and the data to be populated varies for each type of Transcription Engine:
- Amazon Transcribe Server parameters:
- Transcription service name – enter a name of your choice to designate this transcription engine.
- Access Key ID – enter the access key for the Amazon account to be used for transcribing.
- Secret Key – enter the secret key for the Amazon account to be used for transcribing.
- Server Regions – select the region where the Amazon account resides from the drop-down.
- Amazon S3 Location – enter the Amazon S3 storage location that will be used for uploading source audio files and holding transcription results files.
- Test Connection – click the button to test the settings entered in the above fields.
- Azure Speech-to-Text Server Settings:
- Transcription service name – enter a name of your choice to designate this transcription engine.
- Service Resource Location – enter the location of the Azure Speech Service.
- Speech Service Name – enter the name of the Azure Speech Service.
- Speech Service Key – enter the service key for the Azure Speech Service.
- Storage Connection String – enter the connection string used to connect to the Azure Storage Account. This can be found in Access Keys tab for the storage account on Azure web client.
- Blob Storage Container – enter the name of the Azure Blob container that will be used for uploading source audio files and holding transcription results files.
- Test Connection – click the button to test the settings entered in the above fields.
- Enghouse Transcription Server Settings:
- Transcription service name – enter a name of your choice to designate this transcription engine.
- Enghouse Transcription Server URL – enter the URL of the Enghouse Transcription Server.
- Enghouse Transcription Server API Key – enter the API key for the Enghouse Transcription Server.
Store Transcription Attempt Data – check the box to enable saving of transcription attempt data to the database.
Max Number of Active Transcription Requests – Enter the maximum number of requests that can be active on the transcription service at one time. If the maximum is reached, QMS will place new requests in a queue for processing after the number of active requests is below the maximum.
On Demand Transcription Settings
On Demand Transcription Settings controls whether or not transcription is triggered for On Demand recordings i.e. recordings demanded by a user and not triggered by a call recording profile.
To configure on-demand transcription complete the following steps:
- Click the Enable Transcription checkbox.
- Optionally, click the Prevent transcription of calls less than [] seconds to activate it. The default is 15 seconds. Enter a value to prevent Quality Management Studio from creating automatic transcriptions on calls less than the specified duration.
- Optionally, click the Prevent transcription of calls more than [] seconds to activate it. The default is 3600 seconds. Enter a value to prevent Quality Management Studio from creating automatic transcriptions on calls greater than the specified duration.
Translation Engine Settings
Enable Translation – check this box to enable and configure Translation settings.
Translation Engine Type – select the type of translation service to use from the drop-down list. Currently, only one type of translation service may be selected:
- Amazon Translate
Translation Server List – The list of translation servers is dependent on the selected Translation Engine Type. The add/edit dialog and the data to be populated for the selected Transcription Engine:
- Amazon Translate Server parameters:
- Access Key ID – enter the access key for the Amazon account to be used for transcribing.
- Secret Key – enter the secret key for the Amazon account to be used for translating.
- Server Regions – select the region where the Amazon account resides from the drop-down.
- Amazon S3 Location – enter the Amazon S3 storage location that will be used for uploading source audio files and holding translation results files.
- Test Connection – click the button to test the settings entered in the above fields.
EnghouseAI Engine Settings
These settings configure the connection to the EnghouseAI servers that will handle AI processing. You will need to supply the credentials to an EnghouseAI service-based account (i.e. machine-to-machine) that represents your QMS server . User based accounts (i.e. username/password) are no longer supported.
- Enable EnghouseAI Analysis – check this box to enable and configure the EnghouseAI engine.
- EnghouseAI Server List – select from the list of EnghouseAI servers already defined in your configuration, or click the Add (pencil) icon to create a new server. Only one EnghouseAI server may be selected at a time.
- EnghouseAI Server parameters:
- ClientId – enter the client identifier representing the QMS application in the EnghouseAI OpenID authentication flow.
- Client Secret - enter the client secret representing the QMS application in the EnghouseAI OpenID authentication flow
- Token Endpoint – enter the full URL of the token endpoint of the EnghouseAI OpenID authentication service. e.g. https://[servername]/auth/realms/[tenantname]/protocol/openid-connect/token
- Agent Evaluation Endpoint – enter the full URL of the agent evaluation endpoint of the EnghouseAI service, e.g. https://[tenantname].vecko.com/cqc
- Call Summary Endpoint – enter the full URL of the agent evaluation endpoint of the EnghouseAI service. e.g. https://[tenantname].vecko.com/summarization
- Sentiment Endpoint – enter the full URL of the sentiment endpoint of the EnghouseAI service. e.g. https://[tenantname].vecko.com/sentiment
- EnghouseAI Server parameters:
Click the Save button on the action bar located at the top right of the tenant editing tab. The tab will refresh and the tenant name will now display as the tab title.
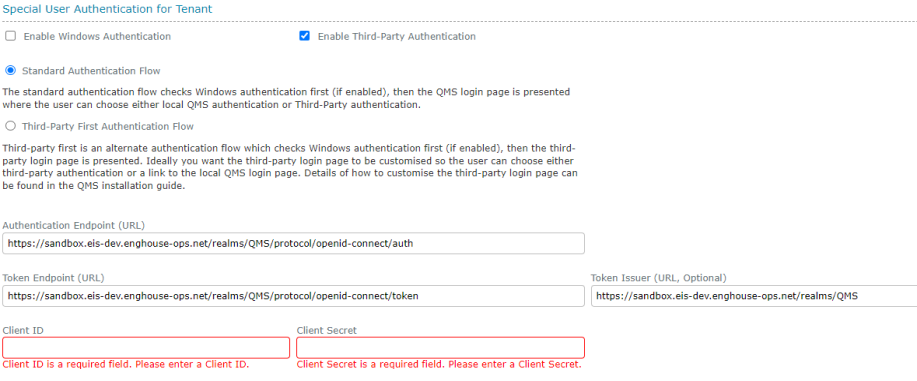
Third-Party Authentication Settings for Tenants
For Third-Party Authentication settings for the provider and base QMS Client are specified in General Settings. See that section for details on configuring the provider authentication. This section only applies to Third-Party authentication that is enabled for a specific Tenant. Third-Party Authentication can be enabled and connected to any OpenID compliant authentication service. You will need to have a client configured on the authentication service to represent the QMS application and know the ClientID and ClientSecret.
In order for third-party authentication to work with tenants, each tenant must run in their own virtual directory on the QMS web server. You can configure tenant virtual directories from the General Settings page.
The following fields are mandatory unless specified otherwise. If not known, the endpoint values can be obtained from the configuration URL of the third-party authentication provider which returns a JSON message containing this information:
-
Authentication Endpoint: The OpenID authentication endpoint of your chosen authentication provider. This is the URL which will initiate the authentication process.
-
Token Endpoint: The OpenID token endpoint. This is the URL which exchanges the authentication code obtained from the authentication endpoint with a JWT token containing the user information.
-
Token Issuer (optional): The token issuer URL of the third-party authentication provider. This URL must match the ISS value returned in the auth token to be valid. If no Token Issuer URL is supplied, this additional security step is ignored.
-
ClientID: The client identifier which represents your QMS system on the authentication provider.
-
ClientSecret: The secret key which identifies your QMS client on the authentication provider. This should only be known between the QMS system and the authentication provider.
|
|
If your tenant administration pages do not show these settings, make sure you have enabled Virtual Directories for all Tenants under General Settings |

We recommend using KeyCloak or Microsoft EntraID as authentication providers as these two have been verified as compliant with QMS authentication, however any OpenID compliant authentication service should be compatible.
See Also: