Performing the Installation
The Enghouse QM Suite Installer is an all-in-one install. This single installer includes all the components required for a standard QMS deployment, including prerequisites. There are two versions of the installer, one that bundles all the needed prerequisites and one that requires an internet connection to first download missing prerequisites before they can be installed.
The bundled version includes all possible prerequisite installers, such as .NET and MS SQL Express 2017. These prerequisite installers can be large and since there are so many variations that have to be included, this bundled version of the installer is quite large, 600 MB. But the advantage is that this installer can be burned to DVD and installed on internal systems that do not have internet access.
The non-bundled version is much smaller, approximately 40 MB, and if a prerequisite is missing, it will automatically download the installer file and execute it. Since only missing prerequisites are downloaded and only the version needed for that system, it won’t take a lot of bandwidth to get the required files. This installer can also be used in an environment that does not have internet access, assuming prerequisites are already installed. The installer will still check and verify that they are included.
To use the QMS installer, you must either be logged in as system administrator or elevate the installer file by right clicking the .exe and selecting “Run as Administrator”. You will need to enter proper administrator credentials to do this.
This section will walk you through each step of the installer and provide information on all options you can select.
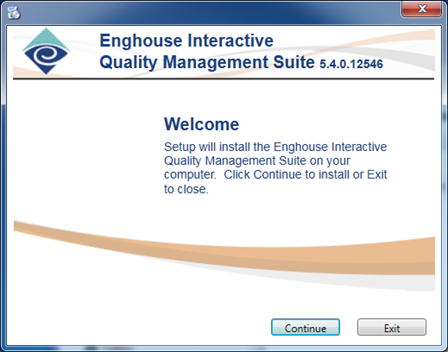
Welcome Screen
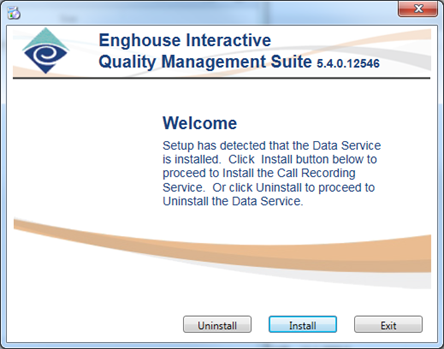
This is the first screen of the installer. You will note the version and build number is displayed at the upper right of the screen. There are two variations of this screen. If there are no QMS components already installed, then the installer knows that you are installing and you will see a ‘Continue’ and ‘Exit’ button. Also, if the Data Service, Call Recording Service and Media Processing Service are already installed, then the installer knows that you are uninstalling and you will see the ‘Continue’ and ‘Exit’ Button.
But if you have not installed all components, then you will need to tell the installer whether you are installing a new component or uninstalling the component that is already there. In this case, you will see an ‘Install’, ‘Uninstall’, and ‘Exit’ Button.
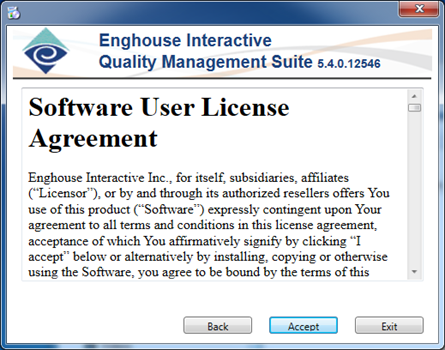
License Screen
Next is the Software User License Agreement. Please read through the agreement and select ‘Accept’ if you agree or ‘Exit’ if not.
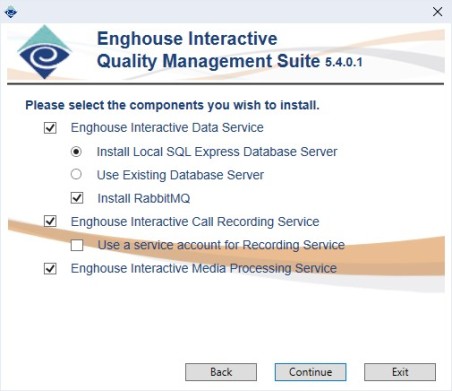
Selection Screen
This screen allows you to select what QMS component(s) you want installed. By default, the Data Service, Call Recording Service and Media Processing Service will be checked. In addition, you may choose to provide a Windows service account for each service instead of using the default Local System account. Also, the Data Service install can either Install Local SQL Express Database Server or you can connect to an existing database server.
Installing Microsoft SQL Server Express
If you do not already have SQL Server, the Data Service Installer will detect its absence and install SQLServer Express 2019. If you prefer a different version of SQL Server, you must manually install it before the Data Service.
An existing server can be either a local or remote SQL Express Database or a full SQL Server deployment. If the Use Existing Database is selected, an optional database step will allow you to enter the database connection information.
The final option on this screen is the Create QMS Database option. This option is assumed when installing a local SQL Express Server, but with an existing database, you may or may not want to install the QMS database depending on if it already exists on that server. If this option is checked and the QMS database already exists, the install will fail.
|
|
Note Be careful with using an existing QMS database. If using a database from a previous QMS version, the data schema may have changed in the new version and using the older schema will result in a failure. In this case, the upgrader or a manual update of the data schema will need to be used. |
Installing RabbitMQ
If you do not already have RabbitMQ installed in your environment, you have the option to install it locally with the DataService. The option is selected by default. If you choose to have RabbitMQ installed with the DataService, the installer will configure RabbitMQ with a default "qmsadmin" user with a default password of "admin". The RabbitMQ UI will also be enabled and is reachable by navigating to http://localhost:15672/ on the DataService machine and logging in with the default credentials.
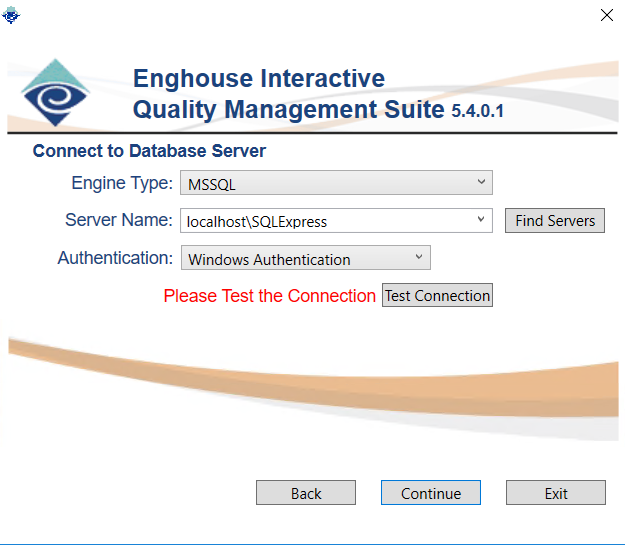
Database Connection Screen
This screen will only appear when the Use Existing Database Server option is selected from the Selection Screen. This screen will gather all information needed to connect to the existing database.
Two types of SQL Engines are supported, MSSQL (Microsoft SQL Server) and PostgreSQL
The Server Name field can either be filled in manually or if MSSQL is the engine type, use the ‘Find Servers’ button to search the network for valid SQL Servers. A server search may take a while. If entered manually, you can use the server name with or without domain or IP address. Localhost is also a valid server name entry. If using a SQL Express server, you will need to include SQLExpress as the instance name, for example, “localhost\SQLExpress”.
Two types of Authentication are supported, Integrated Windows Authentication or standard SQL Server Authentication. If connecting to a PostgreSQL engine, a User Name should be supplied for Windows Authentication. Typically in the form of username@domain and it needs to match the username that is configured exactly. PostgreSQL needs to be configured to use Kerberos/SSPI authentication. Windows Authentication can only be used with PostgreSQL if both the PostgreSQL server and the QMS Data Service server are running on Windows and in the same domain.
|
|
Note If you want to use a service account that is different from the current logged in user account for SQL Server Windows Authentication, you will need to run the QMS installer as a different user. To do this, you will need to:
|
If SQL Server Authentication is used, you will need to enter a User Name and Password credentials. The database credentials used must have permissions to create and modify the database and tables. The SQL Server must be configured to allow for SQL Server Authentication. If the SQL Server and Data Service are located on the same box, it is recommended that you enable and use named pipes for performance reasons.
|
|
Note If you are intending to use an Azure serverless SQL DB, you must:
|
Once all the information is entered, you can use the ‘Test Connection’ button to verify that the Database server connection is accessible and the proper credentials are provided. This test does not create the database or tables, so it is not verifying that the provided credentials have the appropriate permissions or that the database or database files do not already exist. For MSSQL the account that is used must have the required permissions to create and modify a database and tables on the SQL Server. For PostgreSQL the account used must have the Login, Superuser and Create Database privileges.
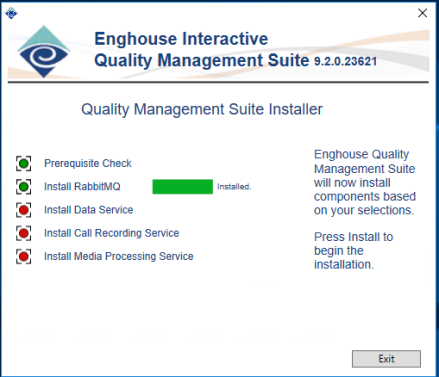
Progress Screen
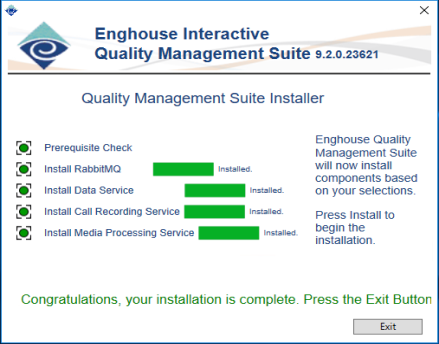
This screen shows progress as the various components are installed. A green indication means that the item has been or is already installed. Red indicates that it has not yet been installed. Which indicators appear depends on the items selected on the selection screen. For example, if only DataService is installed, the Call Recording Service and Media Processing Service indicators will not appear. Once the Install button is clicked, the install process will begin.
Note For uninstalls, indicators will appear only for Data Service and Call Recording Service based on the user selection. Once the ‘Uninstall’ button is clicked, the selected items are uninstalled.
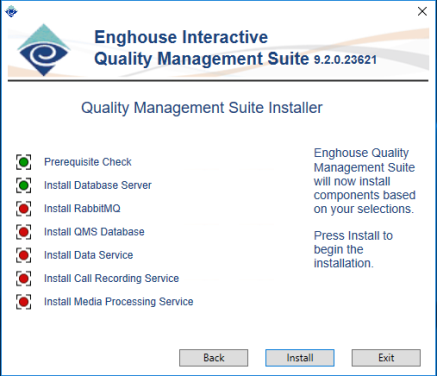
As components are being installed, a green progress bar will appear indicating the installer’s progress. The Data Service and Call Recording Service installers will pop up additional windows that you will need to provide information to in order to progress through the install. This is discussed in more detail below.
Once the entire installation (or uninstall) is completed the progress screen will show all green indicators and a congratulations message will appear.
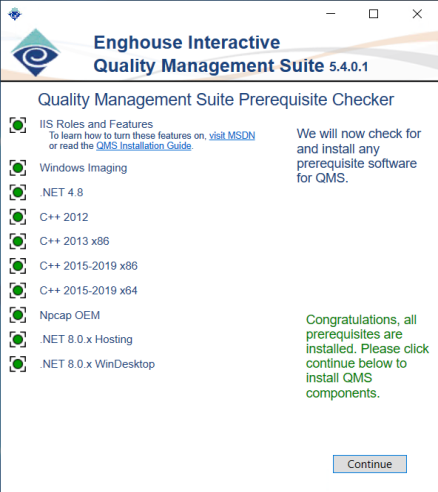
Prerequisite Checker
This screen does several things involving prerequisites for the software. This is designed to verify that all software prerequisites are installed and automatically install missing prerequisites when possible.
The first check made involves Windows Server Roles and Features. The following table breaks down what Roles or Features are required:
Data Service
- IIS Installed with all the features listed in Section 2 above.
- .NET Framework with non-HTTP Activation
- If Windows Server OS, Desktop Experience
Call Recording Service
- If Windows Server OS, Desktop Experience
Media Processing Service
- If Windows Server OS, Desktop Experience
Windows Roles and Features must be installed through the Server Manager and cannot be automatically installed, but the installer does check to verify that they have been properly installed and will stop installation with a message of what items need installed before the installer can proceed. For more information on how to install these features, see Section 2 or click the links provided in the installer.
The Prerequisite Checker will also verify that all required software is installed and will attempt to download and install any missing components. For a list of required prerequisites see the table below:
Data Service
- Microsoft .NET 4.8
- Windows Imaging
- Microsoft Visual C++ 2012 Redistributable
- Microsoft Visual C++ 2015-2019 x86 Redistributable
- Microsoft Visual C++ 2015-2019 x64 Redistributable
- .NET 8.0.x Hosting
- .NET 8.0.x WinDesktop
- Optional: SQL Express
Call Recording Service
- Microsoft Visual C++ 2012 Redistributable
- .NET 8.0.x Hosting
- .NET 8.0.x WinDesktop
- WinPcap 4.1.3 or Npcap OEM
Media Processing Service
- Microsoft Visual C++ 2012 Redistributable
- .NET 8.0.x Hosting
- .NET 8.0.x WinDesktop
Red and green indicators will show if the prerequisite is installed. If the prerequisite is not already installed and the non-bundled version of the installer is being used, a yellow progress indicator will show the downloading progress of all the prerequisite installers.
Once the prerequisites are downloaded or if using the bundled version, the installer will automatically install each of the prerequisites. Most of these installs will be silent, meaning user interaction is not required, but you will see progress indication with a green progress bar as the prerequisite is being installed.
Note: SQL Express install does not require any interaction, but can take several minutes to complete. Please be patient with the installer.
The WinPcap 4.1.3 install does require interaction so refer to the section below for information on completing that install. Once all prerequisites are installed, all indicators should be green and you will see a congratulations message in the window. Click the ‘Continue’ button to continue with the component installation.
QMS also supports Npcap deployments that are licensed by the QMS customer. Npcap can be installed in WinPcap-compatible mode or in native mode with or without the WinPcap installation.
When Quality Management Suite is installed its services (Call Recording Service, Media Processing Service and Data Service) are configured to run using the Local System account, which has full permissions. However, for better security the services should run from their own service account, which has only the permissions they require. Your organization's security requirements will dictate which account runs the Quality Management Services.
You must configure custom service accounts for Call Recording Service and Data Service before you enable recording encryption. To change the service accounts, complete the following steps:
For Call Recording Service:
- From Windows Start, select Administrative Tools.
- Double-click Services. The Services window displays.
- In the Services window, double-click a Call Recording Service to display its properties.
- On the Log On tab, select This account.
- Enter the name and password of the account the service should run as.
- Click OK.
For Data Service:
- From Windows Start, select Administrative Tools.
- Double-click Services. The Services window displays.
- In the Services window, double-click a Data Service to display its properties.
- On the Log On tab, select This account.
- Enter the name and password of the account the service should run as.
- Click OK.