Configure Secure Transport (Optional)
The Quality Management Suite can be configured to run under a secure transport layer (TLS/SSL) for all communication with the following components:
- The QMS Client website
- The QMS Data Service
- The QMS Call Recording Service
- The QMS Media Processing Service
The QMS Configuration Tool (QMSConfig.exe), used to enable SSL for any of these components, can be found in the installation directory of the relevant QMS server. Additional steps are required before using the tool as detailed below.
Configuring the QMS Server(s) for SSL
Prerequisite Needed before Configuring QMS for SSL
The method employed in this example makes use of Active Directory Certificate Services to ease the process of establishing trust relationships between hosts, although using an in-house standalone certificate authority or purchasing certificates from a trusted third party certificate authority, can be used.
Prerequisite: The QMS Server must be on a domain which has an Active Directory Certificate Authority (Services). This is the case for most customer installations.
Requesting a certificate
Before configuring SSL on QMS Components, a valid certificate must be installed on any QMS server that will have at least one of the following components secured:
- QMS Client website
- QMS Data Service
- QMS Call Recording Service
- QMS Media Processing Service
The following process can be used for any system that is a member of the domain, and should be used on any system where a certificate is needed:
- In a Command Prompt Window, type in “mmc.exe”. Click Yes. Microsoft Management Console will appear.
- From the File menu, select Add/Remove Snap-in.
- In the Add or Remove Snap-ins list, select Certificates and click Add.
- On the Certificates snap-in dialog, select Computer Account option and click Next.
- On the Select Computer dialog, select Local Computer and click Finish.
- On the Add or Remove Snap-ins list. Click OK.
- On the left side on the Microsoft Management Console screen, expand Certificates (Local Computer).
- Right click Personal immediately below Certificates (Local Computer) and select All Tasks > Request New Certificate
- The Certificate Enrollment – Before You Begin screen will appear. Click Next.
- The Select Certificate Enrollment Policy screen will appear. Click Next.
- The Certificate Enrollment -Request Certificates screen appears. Make sure Computer option is selected and that application policies include both Client and Server Authentication.
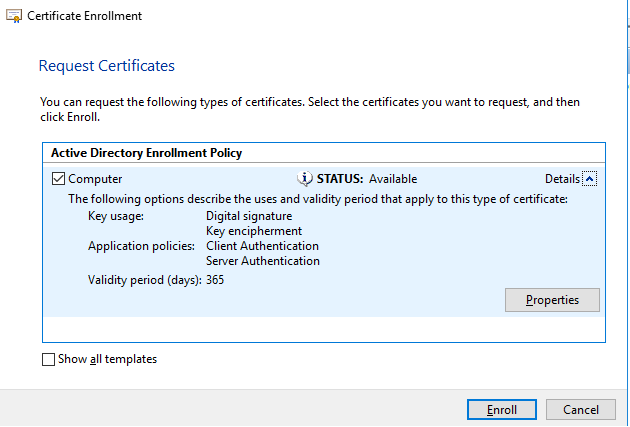
Click the Enroll button.
After enrollment, a new certificate should appear on the right side pane of Microsoft Management Console when Certificates (Local Computer) >Personal > Certificates is selected in the tree on the left side of the screen.
Repeat the above procedure (“Requesting a certificate”) on all machines that house QMS Components that will be secured with SSL.
Configure IIS for SSL
Open IIS Manager and navigate to Sites > Default Web Site > Bindings. Remove the http binding on port 80 and add the https binding on port 443. Select the installed SSL certificate when adding the https binding. Be sure to enter the FQDN of the server where the client is installed.
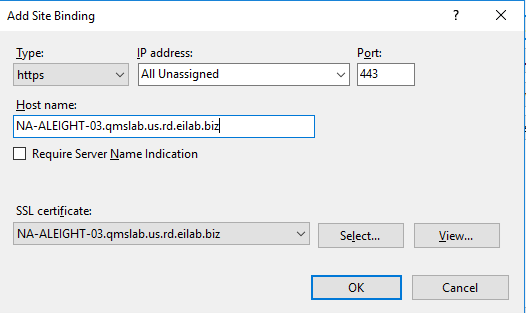
Navigate to Sites > Default Web Site > SSL Settings and ensure “Require SSL” is checked and Client Certificates is set to “Accept”.
Run QMSConfig tool to configure QMS component security options
Locate the QMSConfig.exe file in the QMS installation folder. Double-click this file to start the QMS Configuration tool.

Click on the Security button to access the QMS Security Settings view.
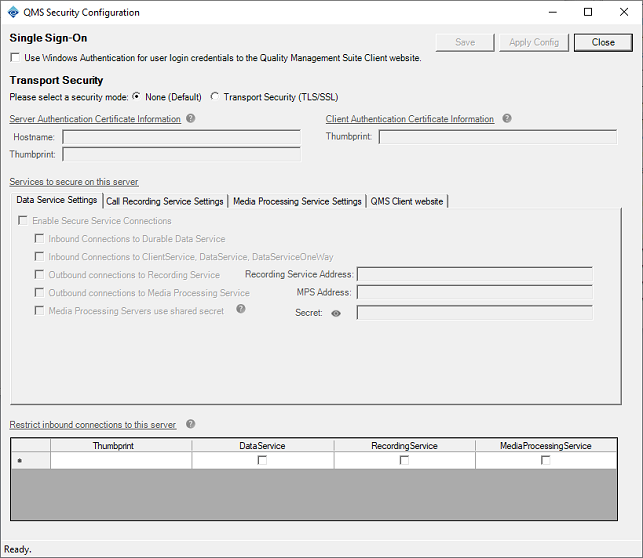
To enable secure connection functionality, select Transport Security for the security mode.
Enter in the FQDN of the server in the Hostname field. This value must match exactly the Subject field of the SSL certificate being used to secure connections to/from this server.
Enter the Thumbprint for a certificate that has an Extended Key Usage value of Server Authentication under the Hostname field.
Enter the Thumbprint for a certificate that has an Extended Key Usage value of Client Authentication to the right of the Hostname field. This value can be (and likely is) the same value as the Thumbprint from the previous step.
|
|
The Thumbprint for a certificate can be found via the Certificates snap-in for MMC.exe. In the Certificates snap-in, find the certificate in the Local Machine’s Personal > Certificates node. Right-click on the Certificate and select Properties. Click on the Details tab, find Thumbprint, and copy the value. |
Configure QMS Data Service for SSL
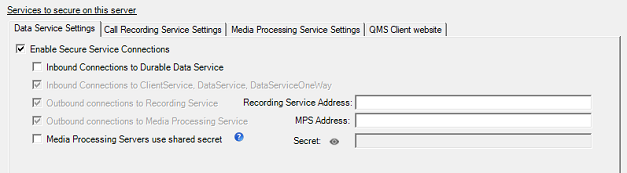
To enable secure connections to the Data Service, click on the Data Service Settings tab and check the Enable Secure Connections checkbox.
|
|
Some checkboxes on these tabs are always disabled. These checkboxes are merely visual indicators as to what specific connections are secured when the Enable Secure Connections checkbox is checked. |
To secure connections into the Durable Data Service, check the Inbound Connections to Durable Data Service checkbox.
|
|
Once the Durable Data Service has been secured on the Data Service, all Call Recording and Media Processing Services that connect to the Data Service must also have their connections to the Durable Data Service secured. |
Enter the FQDN of the server running the QMS Call Recording Service that this server will connect to into the Recording Service Address field. The address could be the FQDN of the current server, if the Recording Service is running on this server as well.
Enter the FQDN of the server running the QMS Media Processing Service that this server will connect to into the MPS Address field. The address could be the FQDN of the current server, if the MPS is running on this server as well.
Each server listed in the Address fields must trust the certificate installed on this QMS server, and vice versa. See section How to Export and Import a Certificate below for further details.
Configure QMS Call Recording Service for SSL
To secure audio streams for Live Monitor requests, check the Live Monitor Streams checkbox.
To secure connections from Desktop Agent clients, check the Secure Desktop Agent Connections checkbox. Optionally, you can choose to protect the Desktop Agent connections using a shared secret. To do this check the Protect Dekstop Agent connections checkbox and enter a value in the secret field. Secrets must be between 8 and 64 characters including at least one each of uppercase, lowercase, digit and special character. The secret entered here will need to be provided during the Desktop Agent installation.
To enable secure connections to the Call Recording Service, click on the Call Recording Service Settings tab and check the Enable Secure Connections checkbox.
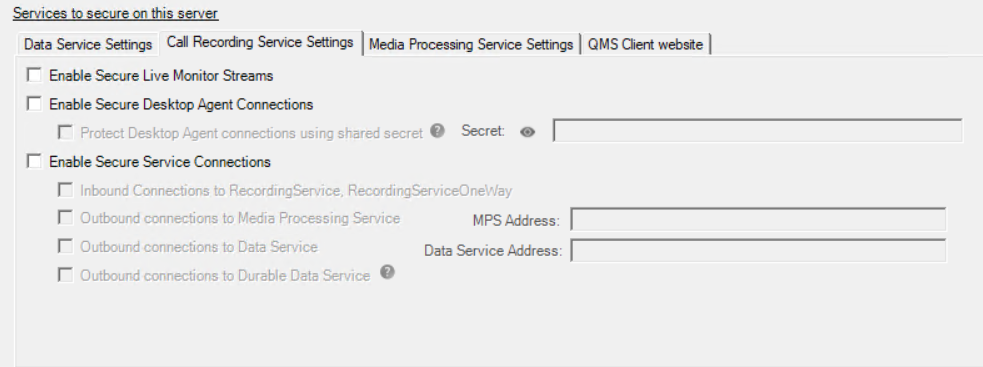
Enter the FQDN of the server running the QMS Media Processing Service that this server will connect to into the MPS Address field. The address could be the FQDN of the current server, if the MPS is running on this server as well.
Enter the FQDN of the server running the QMS Data Service that this server will connect to into the Data Service Address field. The address could be the FQDN of the current server, if the Data Service is running on this server as well.
To secure connections from this server to the Durable Data Service, check the Outbound connections to Durable Data Service checkbox.
Each server listed in the Address and FQDN fields must trust the certificate installed on this QMS server, and vice versa. See section How to Export and Import a Certificate below for further details.
Configure QMS Media Processing Service for SSL
To enable secure connections to the Call Recording Service, click on the Call Recording Service Settings tab and check the Enable Secure Connections checkbox.
Enter the FQDN of the server running the QMS Data Service that this server will connect to into the Data Service Address field. The address could be the FQDN of the current server, if the Data Service is running on this server as well.
To secure connections from this server to the Durable Data Service, check the Outbound connections to Durable Data Service(s) checkbox. This will cause the Thumbprint column to become visible.
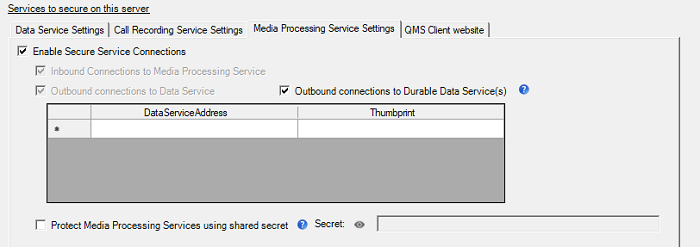
Enter the Server Authentication certificate Thumbprint from the server listed in the Data Service Address field into the corresponding Thumbprint field.
If more than one server running Data Service will be contacted by this server, enter a row for each server (and Thumbprint if necessary) into the table.
Each server listed in the table must trust the certificate installed on this QMS server, and vice versa. See section How to Export and Import a Certificate below for further details.
Configure QMS Client website for SSL
To enable secure connections to the QMS Client website, click on the QMS Client website tab and check the Enable Secure Connections (HTTPS) checkbox.
If connections to the Agent State Service to receive real-time updates should be secured, click the Real-time Updates (Agent State Service) checkbox.
Configure Inbound Connection Restrictions
By default, QMS allows any remote client to establish a secure connection to its services. However, there are some instances where connections to one or more QMS services need to be restricted to a set list of remote clients. To configure these restrictions, do the following:
In the “Restrict inbound connections to this server” table, enter the Client Authentication certificate Thumbprint from a server allowed to connect in the Thumbprint field.
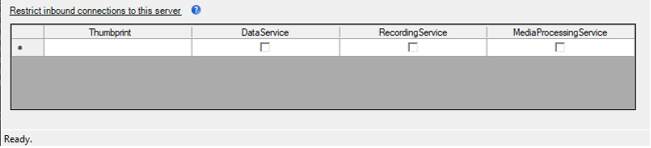
Check each service type to which the remote server is allowed to connect.
If more than one remote client is allowed to connect, create a new row in the table and repeat steps 1 and 2 for each remote server.
Each remote client entered in the table must trust the Server Authentication certificate from this server. Export this server’s certificate via the Certificates MMC Snap-In, then import the certificate into each remote client’s Local Machine\Personal certificate store.
This server must trust each remote client’s Client Authentication certificate. Export each remote client’s certificate via the Certificates MMC Snap-In, then import each certificate into this server’s Local Machine\Personal certificate store.
gRPC Authentication and Authorization
Optionally, Media Processing Services with Secure Service Connections enabled can be configured to authenticate and authorize connecting gRPC clients using a shared secret. To enable the feature at a Media Processor, elect the "Protect Media Processing Services using shared secret" option and set a secret on the Media Processing Service Settings tab. Similarly, on the Data Service Settings tab, "Media Processing Services use shared secret" should be elected and the same secret set. If enabled the secret must be the same across all Media Processors in an installation. The secret needs to be administered separately on each Media Processing host and each Data Service host. The services must be restarted for any configuration change to take effect.
Save and Apply Changes to Security Settings
Once all settings have been configured, click the Save button to save the changes to the respective service configuration files.
In order for the saved changes to take effect, netsh command-line commands may have to be run and services may have to be restarted, depending on what changes were done. Click the Apply Config button to have the netsh commands run and services restarted automatically. This is the recommended course of action.
Changes can be applied manually later as well, if desired. When changes were saved in step 1, two files were created in the QMS installation folder: QMSConfig_NextSteps.txt and QMS_ports_update.bat. Open the QMSConfig_NextSteps.txt file to review what actions need to be done for the security configuration to be complete.
The QMS_ports_update.bat file is a batch script containing the netsh commands that need to be run as an Administrator as part of the Next Steps document. For even more granular control, it is possible to open a command prompt window as an Administrator, then cut-and-paste or manually type each individual command into the command prompt window.
How to Export and Import a Certificate
On the machine you wish to export the certificate from:
- In a Command Prompt Window, type in “mmc.exe”. Click Yes. Microsoft Management Console will appear.
- From the File menu, select Add/Remove Snap-in.
- In the Add or Remove Snap-ins list, select Certificates and click Add.
- On the Certificates snap-in dialog, select Computer Account option and click Next.
- On the Select Computer dialog, select Local Computer and click Finish.
- On the Add or Remove Snap-ins list. Click OK.
- On the left side on the Microsoft Management Console screen, expand Certificates (Local Computer).
- Find the certificate you wish to export. The certificates created above would typically be stored in the Personal certificate store.
- Right click on the certificate and select Open.
- Select the Details tab and click on the Copy to File… button.
- The Welcome to the Certificate Export Wizard screen will appear. Click Next.
- The Export Private Key screen will appear. Select No, do not export the private key. Click Next.
- The Export File Format screen will appear. Select DER encoded binary X.509 (.CER). Click Next.
- The File to Export screen will appear. Enter a location and filename to use to export the certificate to. Click Next.
- The Completing the Certificate Export Wizard screen will appear. Click Finish.
Once the certificate has been exported, you can now import that certificate to another machine. On the machine you wish to import the certificate to:
- Copy the certificate file created above to the machine you wish to import the certificate on.
- In a Command Prompt Window, type in “mmc.exe”. Click Yes. Microsoft Management Console will appear.
- From the File menu, select Add/Remove Snap-in.
- In the Add or Remove Snap-ins list, select Certificates and click Add.
- On the Certificates snap-in dialog, select Computer Account option and click Next.
- On the Select Computer dialog, select Local Computer and click Finish.
- On the Add or Remove Snap-ins list. Click OK.
- On the left side on the Microsoft Management Console screen, expand Certificates (Local Computer).
- Right click Personal immediately below Certificates (Local Computer) and select All Tasks > Import…
- The Welcome to the Certificate Import Wizard screen will appear. Click Next.
- The File to Import screen will appear. Select the certificate file to be imported. Click Next.
- The Certificate Store screen will appear. Select Place all certificates in the following store and enter Personal as the Certificate Store. Click Next.
- The Completing the Certificate Import Wizard screen will appear. Click Finish.