Editing Workflows
Users with the Create Workflow permission in their Security Profile can edit workflows.
To edit workflows, click the ![]() navigation icon and then click the Evaluation Workflow link from the administration sub-menu. The Workflow tab displays containing the list of workflows. To edit a workflow, click the
navigation icon and then click the Evaluation Workflow link from the administration sub-menu. The Workflow tab displays containing the list of workflows. To edit a workflow, click the  icon on the workflow row you wish to edit. A new tab will open with the workflow name as the tab title.
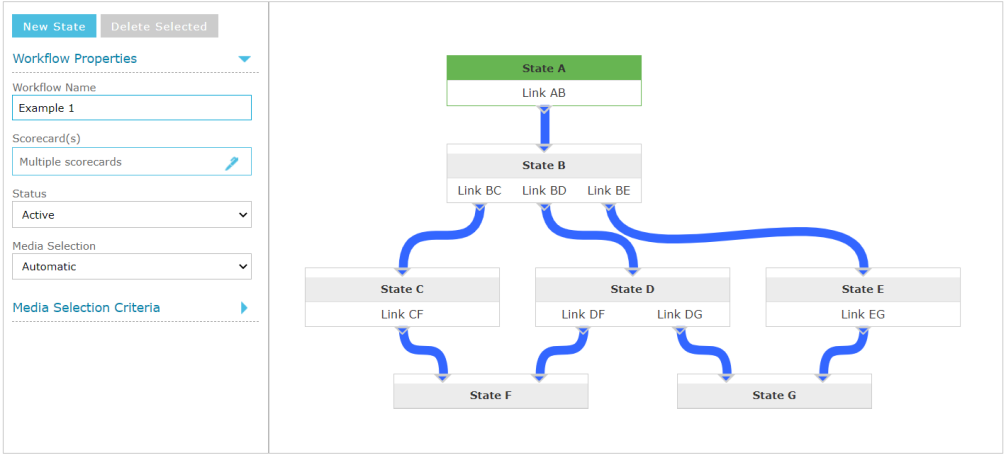
The workflow editor contains two main parts: the property pane on the left (containing workflow, state and transition properties) and the flowchart editor on the right.

Workflow Properties
Workflow properties are properties that pertain to the entire workflow.
-
Workflow Name: a display name for the workflow
-
Scorecard(s): one or more scorecards associated with the workflow. When creating an evaluation based on this workflow, only these scorecards will be selectable.
-
Status: active workflows can be selected for new evaluations. Inactive workflows cannot. While designing a new workflow it is advisable to leave it as inactive until ready for use.
-
Media Selection: the media selection mode. Choose from None (evaluations without media), Manual (user selected media) or Automatic (media is automatically selected based on the media selection criteria.
Media Selection Criteria
The media selection criteria are only applicable when the Automatic media selection mode is selected.
-
Media Type: select one or more media types. The available media types are determined by the media types already used in recordings and the current licensing.
-
Date: select a date range (based on media start time) from Any, Last x days or a specific start and end date.
-
Duration: select a duration criteria (based on the length of the recorded media)
-
Direction: select a media direction (inbound, outbound or both).
-
Flags: specify one or more flag rules to search for.
State Properties
State properties are properties that pertain to the selected state object in the flowchart editor only. Each state object can have a different set of properties.
-
Label: a display name for the state.
-
Assign Rights: a list of users and/or groups that can have assign rights (i.e. be the assigned to user) of an evaluation when it is in this workflow state. See the Users and Groups Dialog section below for more information.
-
Initial Workflow State: the starting state for the workflow. Evaluations created using this workflow will be set to this state initially. Only one state can be selected as the initial state.
-
Disable Media Change: if this option is selected, then media cannot be added to the evaluation when the evaluation is in this workflow state.
-
Disable Scorecard Change: if this option is selected, then the evaluation scores cannot be changed when the evaluation is in this workflow state.
-
Require Complete Scorecard: if this option is selected, then the evaluation cannot transition to the next state until the scorecard is completed.
-
Allow Due Dates: Due dates can be set on the workflow state. This is the date the evaluation is due to be either transitioned to the next state or the evaluation finalized (if this state is the final state). The available options are Off (default), On or Mandatory. If either On or Mandatory is selected then a due date option will be available to the evaluator in the transition dialog when performing an evaluation using this workflow.
-
Send Reminder: If a due date option is selected (On or Mandatory), then this additional option is available to send an email reminder to the current assigned to user at x days before the due date.
Transition Properties
Transition properties are properties that pertain to the selected transition object in the flowchart editor only. Each transition object can have a different set of properties.
-
Label: a display name for the transition.
-
Allow Rights: a list of users and/or groups that are allowed to perform the transition (i.e. move the evaluation to the next state). See the Users and Groups Dialog section below for more information.
-
Show Comments: determines whether the transition dialog includes a text box to enter comments. Can be set to Off, On or Mandatory (the user must enter a comment).
Users and Groups Dialog
The users and groups dialogs are used when selecting edit rights for a workflow state or allow rights for a workflow transition. It contains users, groups and conditional users on the right (non-members) to add to the members list on the left, and vice versa.
-
Users are represented by this
 icon.
icon. -
Groups are represented by this
 icon.
icon. -
Conditional users are represented by this
 icon. These are users that are resolved at runtime rather than specific users (i.e. the evaluator and evaluatee, direct reports and managers).
Flowchart Editor
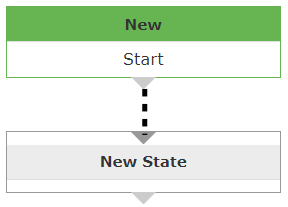
The flowchart editor is a visual representation of the workflow. There are two main objects: States and Transitions. A new workflow will load with one State called “New” and an empty Transition called “Start”.
Adding a State
To add a new state to the flowchart, click the  button. A state object is added to the flowchart with the label “New State” and one input and one output connector. To move the state into position click (hold) and drag on the label bar.

Editing a State
To edit an existing state, click once on the label bar. The selected state will have a darker border than the other states. The left-hand property panel will change to show the selected state’s properties (see State Properties above).

Once selected, you can add (or remove) input and output connectors to the state. Input and output connectors are required in order to create transitions between states. Clicking the -In or -Out buttons will remove the right-most connector first.

Adding a Transition
To add a transition from one state to another, you first need an output connector on the first state and an input connector on the second state. Click once on the input connector (do not hold) and then click again on the output connector to create the transition. A dotted line will be shown after the initial click on the input connector.

Once the transition is created, it will be shown as a solid blue line.

Editing a Transition
To edit an existing transition, click once on the blue transition line. The selected transition change color to black. The left-hand property panel will change to show the selected transition properties (see Transition Properties above).

Deleting a State or Transition
To remove a state or transition object from the flowchart, first select the object in question, then click the  button.
See also: