
Quality Management Suite
Shoretel Port Mirroring
CallRex records and monitors telephone calls by sniffing
packets traversing across the data network. Packet sniffing is achieved by
enabling port mirroring on a data switch and feeding the mirrored port of that
switch to the Sniffing port on the CallRex Server. Port Mirroring is supported
by most data switches and when enabled will send a copy of every packet destined
for one port to another port. For more information on
port mirroring, click here.
CallRex Setup & Configuration
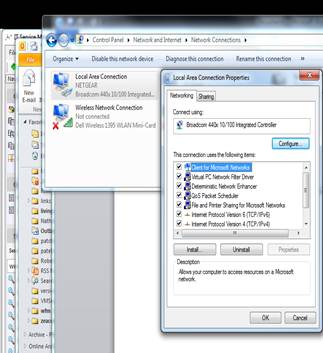
Working in a Shoretel port mirroring environment, the CallRex Server must have 2 NIC's. The primary NIC for a LAN connection must have a static IP address. The second NIC used as the sniffing port, must have the tcp/ip properities unchecked in the NIC properties.
Verify the NIC properties by going to Control Panel > Network & Internet > Network Sharing Center > Change Adapter Settings.
The illustration below shows the Properties page. For the LAN NIC, uncheck Internet Protocol Version 6. For the Sniffer NIC, uncheck both Internet Protocol Version 6 and Version 4.
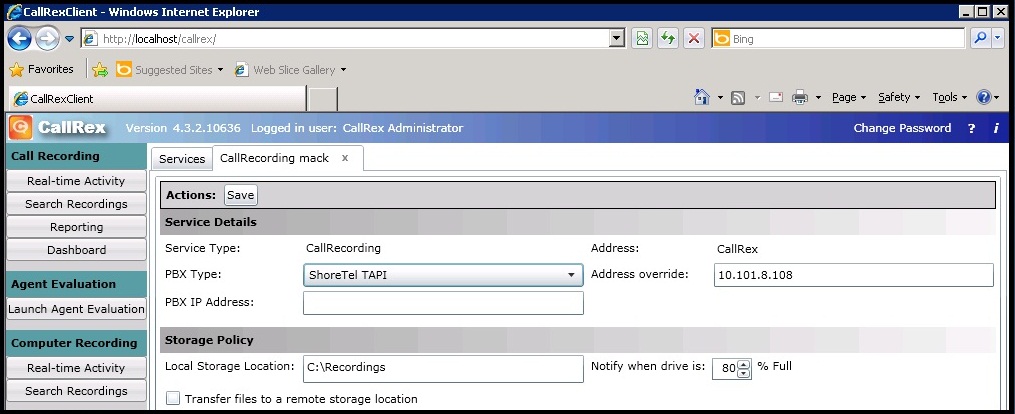
The only other Shortel specific port mirroring thing that you need to do to set the PBX type in CallRex. Login to CallRex and click on the Services button on the left menu. The CallRex Services page will open. Highlight the service and click edit. This will give you the option to select the correct PBX type. Selection Shoretel. Make sure that you save the changes.
Installation of Shoretel Remote Server & Shoretel Setup
1 . Makes sure the requirements of the Shoretel Remote Server are met. On the Callrex Server you must have installed Windows Components: IIS, (If the Shoretel Server is on Windows 2008 - Add IIS Com Plus), FTP, .NET, ASP, SMTP. They need to be installed through Windows Add Remove programs.6. Configure the Call Recording Service for Shoretel Tapi
2.
Then, on the CallRex Server go to http://<Shoreware
Director IP>/ShoreWareDirector/
3. Click “Click here to Download remote server” on the ShoreWare Director web page
4. Have the customer Install the Shoretel Remote Server.
5. You will need to insert the IP address of the Shoretel Server during the installation.
6. If the needed windows components are not installed, the installer will abort with an error message telling you which windows component is missing.
7. NOTE: The most common failure is ASP not installed. This refers to the IIS component. The sub component, Active Server Pages needs to be checked.
8. After the TSP install is complete, go to the registry editor (regedit) on the CallRex Server and go to
HKEY_LOCAL_MACHINE\SOFTWARE\
8. Now have the customer http:// over to the Shoretel Director and login as a full administrator.
9. Go to Administration > Application Server
10. Next to “Add a new application server at site.” Select Headquarters and click “Go”.
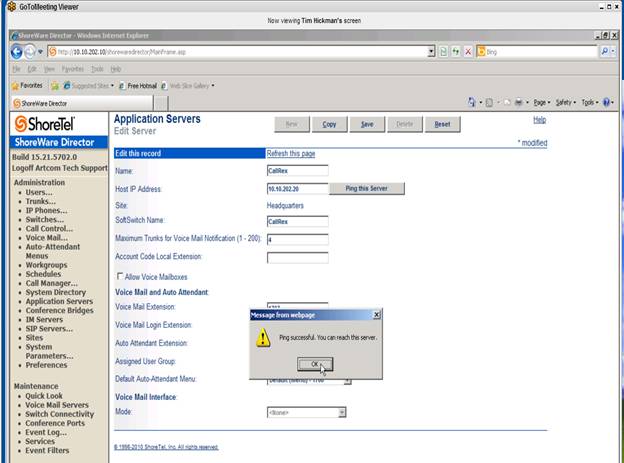
11. Enter a Name, preferably “CallRex”
12. For the HOST IP, enter the IP address of the CallRex server, Status Server (LAN)
13. Uncheck “Allow Voicemail“ check box
a. The voicemail and Auto Attendant setup is not used but there still must be ascending VM extensions in the boxes.
b. (Ex: VM Extension 2000,Auto Mail Login Ext. 2001,Auto Attendant Ext. 2003)
c. For Simplified Message Desk Interface (default value “None”)
14. Click Save
15. Then Click on the “Ping This Server” button to insure communication between the CallRex Server and the Shoretel Server. Insure that you get a “Ping Successful” response.
16. For version 8.1 and up, a custom Codec called Callrex is required. Go to Call Control, Codec Lists. Add a new Codec. Name it CallRex. Add in ONLY
a. G729/8000
b. PCMU/8000
c. PCMA/8000
17. Click Save
18. Now go to "Sites" and select “Headquarters”
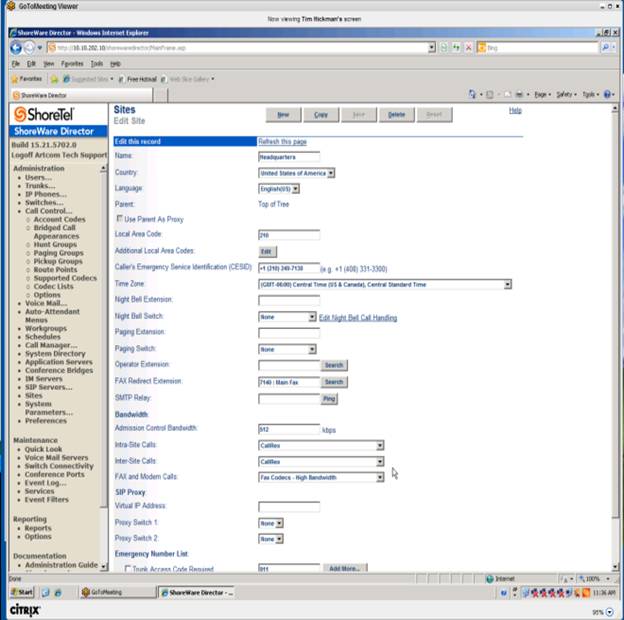
19. Change the options in the Intra-site Calls and Inter-Site Calls to CallRex.
20. Click save
21. Reboot the CallRex Server
Verification
1. Go to the Shoretel Director and log back in with administrative rights.
2. Go to Maintenance > Quick Look
3. Confirm a green up arrow for a successful installation of the ShoreTel Application Server on the CallRex Server otherwise troubleshoot the status listed.

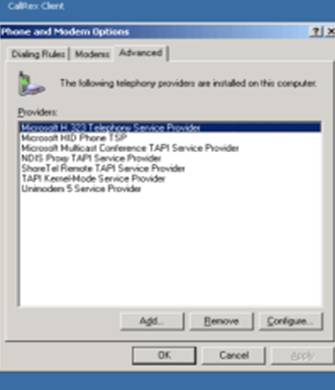
4. Verify that TAPI is working correctly on the CallRex Server. Go to the Control Panel, and select Phone and Modem options. You might be prompted to enter the Customer’s area code. Just enter the area code and click OK.
5. Go to the Advanced Tab. Find the “Shoretel Remote Tapi Service Provider in the Providers list. Highlight and click on Configure.
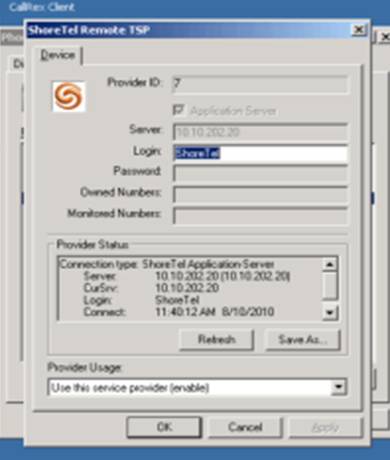
6. The device window will open Verify that the Provider ID is the same # that you found in the registry when you were setting up the TSP.
HKEY_LOCAL_MACHINE\SOFTWARE\
7. Make sure that the Login is Shoretel
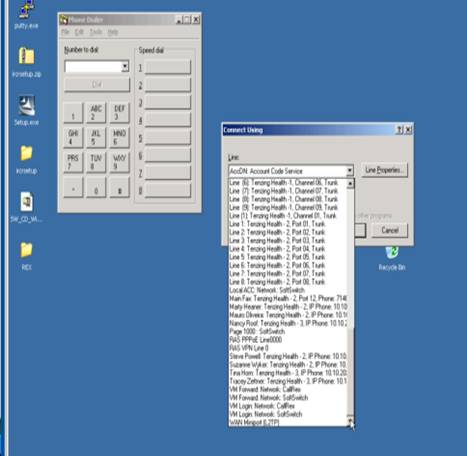
8. Verify the Tapi is working correctly. Go to the Windows command prompt and type in “dialer.exe” Verify in Line Properties, that the Test user that you configured in the CallRex Server is in the drop down list.
Additional Comments
1. Should the ShoreWare Director server be rebooted at any time, the Callrex server should be rebooted after the ShoreWare Director to reestablish the TAPI link
2. If the ShoreTel server has been upgraded and you no longer receive Call Control you must reinstall the Shoretel Remote Server to the new version
4. HKEY_LOCAL_MACHINE\SOFTWARE\
Troubleshooting TMS
1. TMS (Shareware Telephony Management Server)
2. If TMS will not start, do the following:
a. Go to Start, Run Type CMD that will get you to a command prompt Type (C:\ is the default Drive for ShoreTel Use the correct drive letter) CD C:\Program Files\Shoreline Communications\Shareware Remote Server>TMS.exe /regserv
3. It should say successful
4. Then restart the Shareware Telephony Management Server located in the services on the CallRex server
5. Then restart the CallRex services
Packet Capturing:
Shoretel
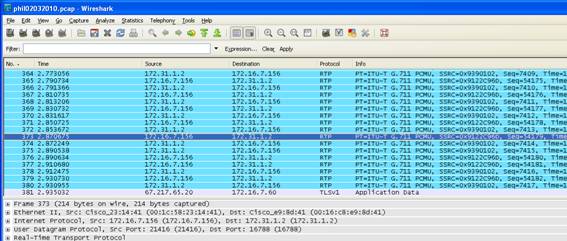
Voice traffic will appear as UDP packets. When decoded as RTP packets, you will
be able to see the Codec and Audio Compression Protocol ex: G711 or G729 Codecs.
How to Capture:
1. Open Wireshark
2. On the TOP menu, Click Capture > Interfaces
3. Click on the Start button next to the Sniffer Interface
4. Place the test call, talk for 15 seconds and then hangup
5. Click Capture > Stop
6. In the Filter field atop WireShark enter ip.addr==192.168.12.100
and hit enter
(Note the 2 = signs) (Note: input the actual IP address of the test
extension)
7. Depending on the size of the capture, it may take several minutes to filter
through and
provide you with the capture you are looking for.
8. Insure that the proper Codec is being used to encapsulate the voice traffic.
On Wireshark, right click on one of the UDP packets.
Select Decode As from the drop down menu. Scroll down to RTP and click OK. It
may take a few minutes to re-filter through.
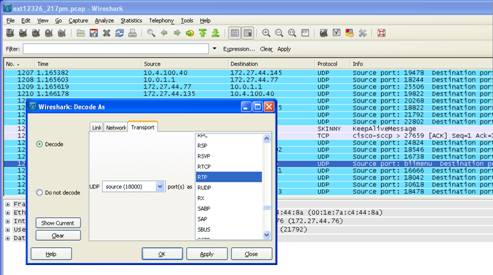
The end result will be to re-filter the UDP packets into RTP packets which will clearly show the Codec. In this case the Codec displayed is G711.
