
Quality Management Suite
NEC 8300, NEC 8500, NEC9300
QMS Call Recording records and monitors telephone calls by sniffing
packets traversing across the data network. Packet sniffing is achieved by
enabling port mirroring on a data switch and feeding the mirrored port of that
switch to the Sniffing port on the QMS Call Recording Server. Port Mirroring is supported
by most data switches and when enabled will send a copy of every packet destined
for one port to another port. For more information on
port mirroring, click here.
Call Control is provided by SIP, Session Initiated Protocol, or NEC PROTIMS. They are application layer protocols that can utilize either TCP or UDP, SCTP and others.
QMS Server Setup & Configuration
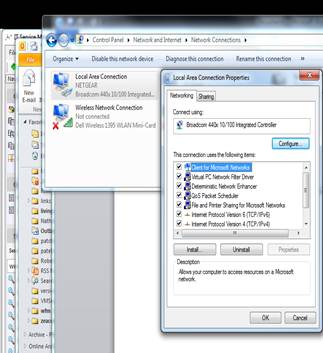
Working in a SIP or NEC PROTIMS port mirroring environment, the QMS Call Recording Server must have 2 NIC's. The primary NIC for a LAN connection must have a static IP address. The second NIC used as the sniffing port, must have the tcp/ip properities unchecked in the NIC properties.
Verify the NIC properties by going to Control Panel > Network & Internet > Network Sharing Center > Change Adapter Settings.
The illustration below shows the Properties page. For the LAN NIC, uncheck Internet Protocol Version 6. For the Sniffer NIC, uncheck both Internet Protocol Version 6 and Version 4.
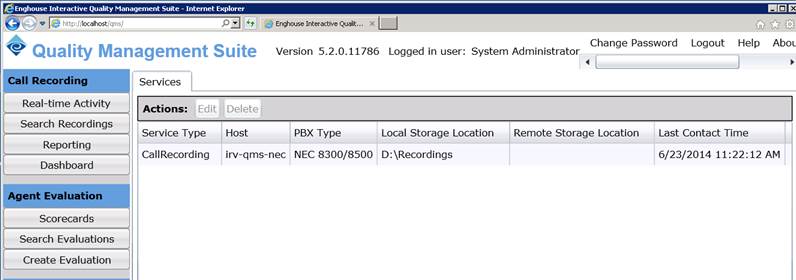
The only other port-mirroring-specific thing that you need to do, is to set the PBX type in QMS Call Recording Server. Login to QMS Call Recording and click on the Services button on the left menu. The Services page will open. Highlight the service and click edit. This will give you the option to select the correct PBX type. Select NEC 8300/8500 for the NEC 8300, NEC 8500, or NEC9300 . Make sure that you save the changes.
SIP Configuation Settings
EnableSipDHCPOnRegister true= Enable false = Disable This is used when QMS does not pickup the IP address of an agent's phone automatically.
EnableLoggingRawSIPMessages true = Enable false = Disable This is used to provide deeper logging to assist in troubleshooting problems. It logs the headerlines from the sniffed message. This should be turned on for testing only and must be turned off as it will generate large logs.
EnableLoggingParsedSIPMessages true = Enable false = Disable This is used to provide deeper logging to assist in troubleshooting problems. This logs the values that the recording service parses from the sniffed message. This should be turned on for testing only and must be turned off as it will generate large logs.
They should be placed in the 'Control' section between <CallRex> and </CallRex>
Example:
<CallRex>
<System MessagingChannel="d258861f-1a90-4fc7-9921-4b9d77ba20a7"
SniffingCard="05b65fd8-2c2a-4673-8f71-f79d3d0c445a" />
<Recording ServiceID="f305ec04-a204-4b41-8437-175a04e72db1"
LastConversionTime="02/26/2015 11:04:20" />
<Control EnableSipDHCPOnRegister="true" VLanEnabled="true" />
<Tsapi />
<Tapi />
</CallRex>
Packet Capturing:
SIP and PROTIMS are Call Control
Protocol. They provide the QMS Call Recording Server with information about the start of the
call, end of the call, Call ID and Caller ID information and more.
Voice traffic will appear as UDP packets. When decoded as RTP packets, you will
be able to see the Codec and Audio Compression Protocol ex: G711, G729, etc. Codecs.
When you do a packet capture what you should see are a series of SIP packets
followed by the audio payload followed by more SIP packets.
How to Capture:
1. Open Wireshark
2. On the TOP menu, Click Capture > Interfaces
3. Click on the Start button next to the Sniffer Interface
4. Place the test call, talk for 15 seconds and then hangup
5. Click Capture > Stop
6. In the Filter field atop WireShark enter ip.addr==192.168.12.100
and hit enter
(Note the 2 = signs) (Note: input the actual IP address of the test
extension)
7. Depending on the size of the capture, it may take several minutes to filter
through and
provide you with the capture you are looking for.
8. In figure 1, you can see the beginning of a call; first the SIP packets
and then the UDP packets which are shown decoded as RTP.

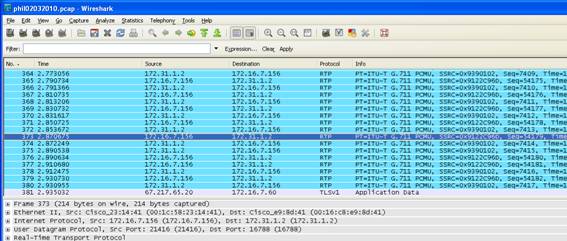
9. The SIP packets display
messages that are interpreted by the CallRex Server. Most of these messages are
readable.
Ex: Ringing. Notify, Register, Invite etc.
And while we do not need to know exactly what they mean, their presence is what
is important. The above string of SIP packets indicate an Incoming call. In
many cases, these packets will be repeated.
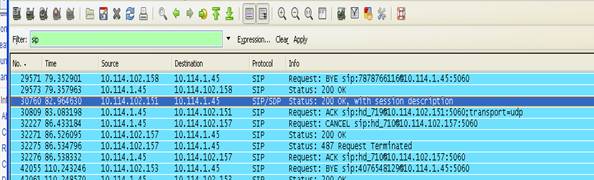
11. Here (below) is the end of a call. Notice the BYE message.
13. Insure that the proper Codec is being used to encapsulate the voice traffic.
On Wireshark, right click on one of the UDP packets.
Select Decode As from the drop down menu. Scroll down to RTP and click OK. It
may take a few minutes to re-filter through.
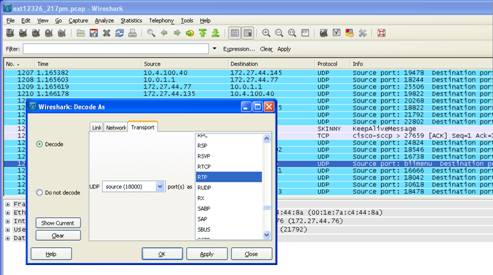
The end result will be to re-filter the UDP packets into RTP packets which will clearly show the Codec. In this case the Codec displayed is G711.
14. The PROTIMS packets are shown below. They will come in, in the 3450-3470 port range for hard phones and the port range of 60000 - 60511 for soft phones. Protim packets are not as literal as SIP packets. Verification that you are receiving them, may be all that is required.

Notes
Normally SIP arrives on port 5060. On rare occasions, it might be some other port. If you encounter this, take the capture filter from the call control log then change the default 5060 to the port they are using. Use the config option CCFilter, then insert the entire filter as the value. Restart services