
Quality Management Suite
Mitel Mitai with SRC
In the Mitel Maitai with SRC configuration, QMS receives call control information from the Mitel Mitai service on the Mitel PBX (see help site page http://help.telrex.com/ts/mitelMitai.html ), but unlike a Mitai integration which relies on a second mirrored sniffing port, in the SRC integration the voice audio comes from a separate SRC server. A customer will choose to use an optional SRC Server when they desire to use encryption, hot desking or DHCP for phones. When an SRC server is employed, the RTP audio will be delivered over the QMS LAN Nic via a tunnel.
1. QMS NIC Setup & QMS Configuration
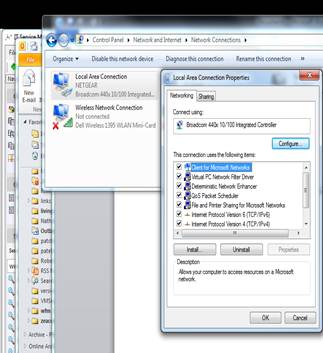
Working in a Mitel Mitai SRC environment, the QMS Server will only have 1 NIC. It is recommended that the LAN Nic have a static IP address and only IPV4 activated. Verify the NIC properties by going to Control Panel > Network & Internet > Network Sharing Center > Change Adapter Settings. The illustration below shows the Properties page. For the LAN NIC, uncheck Internet Protocol Version 6. Then highlight Version 4 and click on properties to setup the Static IP address.
Note: While a simple Mitel Mitai integration will have 2 Nic’s, the Mitel SRC integration only has one Nic. All other Nic’s should be disabled.
2. QMS Configuration
You also need to configure the QMS Services for the Mitel SRC integration. Login to QMS and click on the Services button on the left menu. The QMS Services page will open. Highlight the service and click edit. This will give you the option to select the correct PBX type. Select Mitel SRC.
Set the PBX IP Address to the address of the Mitel Mitai PBX
Set the Api IP Address to 127.0.0.1. This refers to the access point of the tunnel (in this case, the QMS server) which is how we access the src api.
Set the Address Override to the IP Address of the Lan Nic of the QMS Call Recording Server.
Set the Password to ‘password’ or other password that is also used in creating the Mitel tunnel between the QMS Recording Service and Mitel SRC Server. See creating the MSI tunnel below.
Set the Api Port to 23232. This will also need to be identical in creating the MSI tunnel.
Starting audio port is subjective. The default is 35000 which usually works fine.
While you are here, insure that the Windows drive and folder, that is displayed in the ‘Local Storage Location’ area, actually exists.
Make sure that you save your changes.

3. Creating the MSI Tunnel for the Mitel SRC Integration with QMS
Integration of QMS via SRC happens over a tunnel
created by a Mitel tool called the MiSslTunnelServer.exe. Usually this tool is available by default in
the Enghouse Management Suite program folder.
If it should not be there, you can download one at: http://telrexsupport.com/builds/MiSslTunnelServer.exe
Setting up the tunnel.
1. Make sure that the MiSslTunnelServer.exe is in the QMS program folder.
2. Open a command prompt.
3. Run the following command with the IP address
of the Mitel SRC server (the IP address is 192.168.2.129 in this example):
PLEASE NOTE: Do not copy and paste directly from this web
page to the command prompt. Hidden html
characters will make it fail.
You can copy it to notepad, locally and
then copy it to the command prompt. Be
careful that Notepad’s word wrap does not add an invisible return.
MiSslTunnelServer -f missltunnel.ini -p
password -caCN QMS -caAddr
192.168.2.129 -tunListen 127.0.0.1:23232 - tunConnect 192.168.2.129:6810 -tunCA
192.168.2.129
This
command generates a certificate request that is sent to the Mitel SRC server,
which is a certificate authority.
Replace
the 192.168.2.129 with the IP address of the actual Mitel SRC Server.
Leave
the 127.0.0.1 IP address. This also
matches the Api IP Address in the Services area in
QMS.
Note
the port # 23232 must also match the API port number that was entered in the
Services area in QMS.
4. When you see, in the command prompt window, that the MiSslTunnelServer process reaches QUEUED state,
the customer needs to launch the Mitel Standard Linux Server Manager application
by using the following URL: http://[address]/server-manager,
where [address]
is the IP address of the Mitel SRC server.
5. After logging into the Server Manager, click the Certificate Management option from the Security
menu. The Manage Certificates page
opens:
6. Click the Certificate
ID link in the Queues CSRs section. The
certificate appears in a new window with the Cancel,
Reject, and Approve
buttons.
7. Click Approve
to accept the certificate. The success message is displayed.
9. Once
the approved certificate is downloaded by the MiSslTunnelServer
application, the SSL tunnel can be tested by establishing a test connection.
10. You should see
more activity in the command prompt window.
It should conclude with the words ‘Succeeded’.
11. This process will
also create a missltunnel.ini file in the QMS Program folder. The contents of the file look like this. (The key is very, very long)
[general]
version=0
[ca_list]
count=1
ca.0=192.168.2.129
[tunnels]
count=1
tunnel.0=127.0.0.1:23232
[192.168.2.129]
address=192.168.2.129
ssl=0
cn=QMS
private_key=CQyuTjCasXTziNt7Wl2DHh9CWaXnnqmT6AfgQryri+BzwUakAAAAAAAAAAAAAAAAAAA
12. If all goes well,
in the Consolidated Call Recording log, you will see:
13:29:23.9
TRACE [MitelSRCPbxIntegrationContainer.Start]: MitelSRCPbxIntegrationContainer Initialized
13:29:23.9 TRACE [MultiNetworkSocketAudioSource.Start]:
Start Signaled
------------------------------------------------
Accepting
packets on adatper:
1a57522a-dfff-4796-bc09-5b1cff7b1ed2. Ip:
10.105.1.245 startingPort: 20000
13:29:23.9 TRACE [MitelSRCManager.LogFromCPP]:
Calling MiSslTunnelInit2 with params iniFile C:\Program Files (x86)\Enghouse Quality Management
Suite\missltunnel.ini
13:29:23.9 TRACE [MitelSRCManager.LogFromCPP]:
Calling MiSslTunnelInit2 with params password password
13:29:23.9 TRACE [MitelSRCManager.LogFromCPP]:
Calling MiSslTunnelInit2 with params logFile C:\ProgramData\CallRex\Logs\missltunnel.log
13:29:24.4
TRACE [MitelSRCManager.LogFromCPP]: Status of MiSSL tunnel READY_TO_GO: 5
13:29:24.9
TRACE [MitelSRCManager.LogFromCPP]: MiSSL tunnel is OPEN.
13:29:24.9
TRACE [MitelSRCManager.notifySocketClientConnected]:
Successfully connected to <127.0.0.1>.
13:29:25.0
TRACE [BasePbxIntegrationContainer.Start]: Mitel SRC PBX
Integration has been started.
13. Have the customer
verify that they can see the ports registering on the SRC Server.
4. To test the SSL tunnel with a test
connection:
telnet 127.0.0.1 23232
<register_request><id>CallRex</id><protocol_version>1.0</protocol_version></register_request>