Quality Management Suite
Mitel Mitai / QMS Integration
QMS records and monitors telephone calls by sniffing packets traversing across the data network. Packet sniffing is achieved by enabling port mirroring on a data switch and feeding the mirrored port of that switch to the Sniffing port on the QMS Server. Port Mirroring is supported by most data switches and when enabled will send a copy of every packet destined for one port to another port. For more information on port mirroring, click here.
QMS NIC Setup & QMS Configuration
Working in a Mitel Mitai port mirror environment, the CallRex Server must have 2 NIC's. The primary NIC for a LAN connection must have a static IP address. The second NIC used as the sniffing port, must have the tcp/ip properities unchecked in the NIC properties.
Note: This is unlike Mitel SRC integration where only one Nic is required and the audio comes from the SRC Server via a tunnel over the LAN.
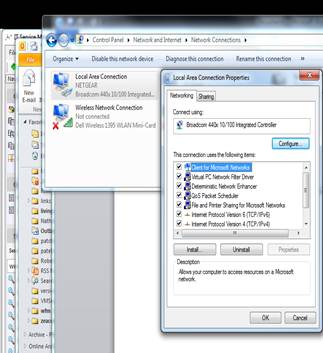
Verify the NIC properties by going to Control Panel > Network & Internet > Network Sharing Center > Change Adapter Settings.
The illustration below shows the Properties page. For the LAN NIC, uncheck Internet Protocol Version 6. For the Sniffer NIC, uncheck both Internet Protocol Version 6 and Version 4.
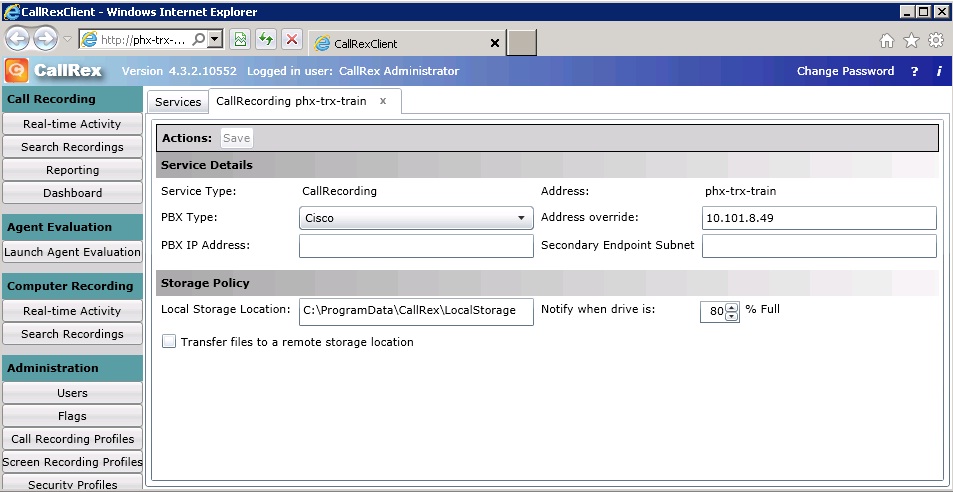
The only other Mitel Mitai specific thing that you need to do to set the PBX type in QMS. Login to QMS and click on the Services button on the left menu. The QMS Services page will open. Highlight the service and click edit. This will give you the option to select the correct PBX type. Select Mitel Mitai. Make sure that you save the changes.
Mitel Mitai Integration with QMS
QMS depends on MiTAI APIs to get call control information (MiTai Protocol). The audio is captured by a sniffing port (Port Mirroring).
Note: With Mitel version 6.1 the audio data is encrypted by default. You must disable this encryption using the Mitel System Administration tool to get proper audio.
It connects from the Mitel IP phone into the network Switch.


Integration with softphones is similar to integration with Mitel IP Phones. But softphones also uses MiTai Protocol so it’s important to have installed the MiTai Protocol at QMS Server and Mitel PBX.
Note: With Softphones, be sure that you are mirroring the data VLAN as the audio from the softphone goes via the Data VLAN and not the voice VLAN.
IMPORTANT NOTE: Early installations of Mitel Mitai were configured to have the Mitai Call Control come through the Sniffer port. That means that Mitel Server is connected and ping-able through the Sniffer Nic. On 4.x this must be changed. The Customer will have to reconfigure his network to isolate the Sniffing port to the mirrored port only and place the Mitel Server on the Lan side of QMS.
Support Files
In the course of
a normal installation, three support files are incorporated in the program
files folder. They are LoggerDll100.dll,
Data Services100.dll, MitaiClient100.dll. They are used by QMS when the Mitel PBX type
is selected. Previous version of these dll’s will not work with QMS 5.4
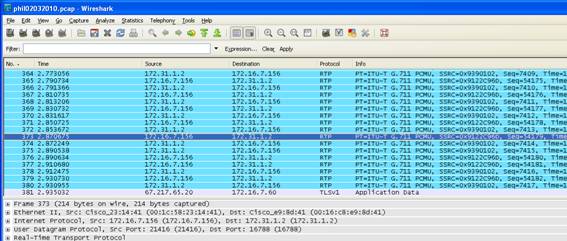
Packet
Capturing:
Mitel Voice traffic will appear as UDP packets. When
decoded as RTP packets, you will be able to see the Codec and Audio Compression
Protocol ex: G711 or G729 Codecs. On the
Mitel Mitai port mirroring integration, the packets will be captured on the
sniffer Nic.
How
to Capture:
1. Open Wireshark
2. On the TOP menu, Click Capture > Interfaces
3. Click on the Start button next to the Sniffer
Interface
4. Place the test call, talk for 15 seconds and then hangup
5. Click Capture > Stop
6. In the Filter field atop WireShark
enter ip.addr==192.168.12.100 and hit enter
(Note the 2 = signs) (Note: input the actual IP
address of the test extension)
7. Depending on the size of the capture, it may take
several minutes to filter through and
provide you with the capture you are looking for.
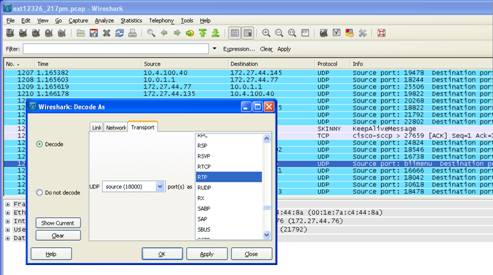
8. Insure that the proper Codec is being used to
encapsulate the voice traffic. On Wireshark, right click on one of the UDP
packets.
Select Decode As from the drop down menu. Scroll down
to RTP and click OK. It may take a few minutes to re-filter through.
The end result will be to re-filter the UDP packets into RTP packets which will clearly show the Codec. In this case the Codec displayed is G711.