
Quality Management Suite
QMS Integration with Avaya IP Office
General
Installation Information
The QMS Call Recording Service records and monitors telephone calls by sniffing
packets traversing across the data network. Packet sniffing is achieved by
enabling port mirroring on a data switch and feeding the mirrored port of that
switch to the Sniffing port on the Call Recording Server. Port Mirroring is supported
by most data switches and when enabled will send a copy of every packet destined
for one port to another port. For more information on
port mirroring, click here.
Note: You must be using QMS Version 5.1 or
higher for DHCP and Extension Mobility to work.
QMS Call Recording NIC Setup & QMS Configuration
Working with Avaya IP Office, the QMS Server must have 2 NIC's. The primary NIC for a LAN connection must have a static IP address. The second NIC used as the sniffing port, must have the tcp/ip properities unchecked in the NIC properties.
1. Verify the NIC properties by going to Control Panel > Network & Internet > Network Sharing Center > Change Adapter Settings.
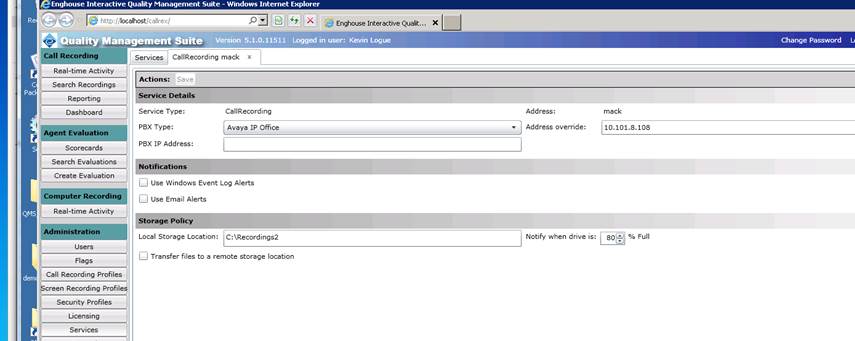
2.1 Install the QMS Server as normal. Login to the QMS client and go to the Services area.
2.2 Highlight the Service and select Avaya IP Office as the PBX type. Put in the PBX IP Address of the Main Avaya PBX or Avaya Server Edition LAN1.
2.3 Put the IP address of the Call Recording Server in the Address overide field.
3. The QMS Call Recording Service requires the use of TAPI for Call
Control with Avaya IPO Office. Call control includes the start of a call,
the end of a call, CallerID information, CallID information and more. Using TAPI with this Avaya integration requires the CTI Link Pro license,
purchased from your Avaya reseller. Insure that the customer has installed
the license.
4. Have the customer install the Avaya Tapi Driver. Install via “tapisetup.exe” available from Avaya. During the installation the customer must enter the IP address of the PBX and the username and password of an IPO account.
The Avaya PBX may have several components. There may be a Server with the Avaya Server edition software, an add-on piece and an appliance. The IP address needed is from the main piece ex: Server running the Avaya Server edition software.
4.1. Reboot the CallRex Server after installing the Tapi Driver.
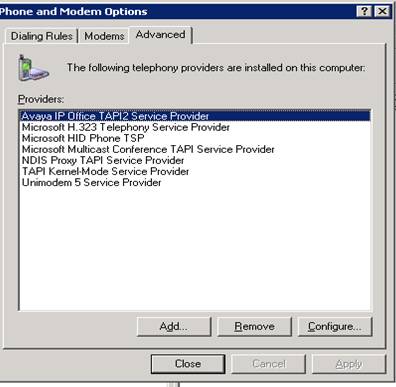
5. Go to Windows Control Panel and then to Phone &
Modem Options. Go to the Advanced Tab. You should see the Avaya IP
Office Tapi2 Service Provider in the Providers list. (Note: If you
are the first person to access Phone & Modem options, you will have to step
through entering the customers area code, etc.)
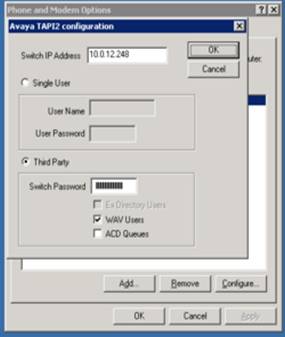
Click on Configure and you will see the configuration screen. The Switch IP address must match the PBX IP. The Third Party option must be checked. The WAV Users must be checked and the Switch Password must be present. This is all done by the Customer, Avaya setup and avaya tech.
5.1. Then use Dialer to test and insure that the Tapi Configuration is correct and working. From the CMD prompt, type in dialer.exe. Phone dialer will open. Atop the phone dialer, click on tools. This will open a window “Connect Using”. Use the drop down arrow in the “Line” field to see a list of extensions that Tapi is communicating with. The CallRex Users to be recorded should be in this drop down list.
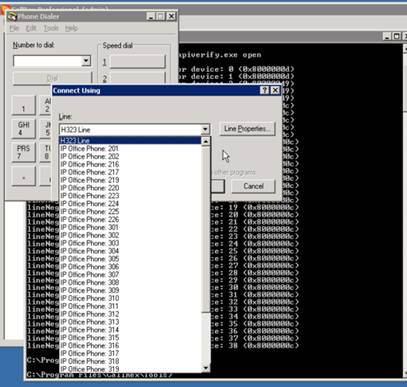
5.2. You should be able to select one of the extensions, click OK, and then use that extension to successfully dial another extension. This is just a Tapi test not a Recording test.
6.0. To insure that Extension Mobility and DHCP is working, you will need to make a change to the Tapi Configuation area in the CallRecordingService.exe.config file. Go to the Tapi area of the Config File. Find '<Tapi' and enter the SNMPServerIPAddress line with the IP address of the Avaya Server Edition Server or main Avaya PBX system. It will look like this:
<Tapi SNMPServerIPAddress="192.168.253.99" />
For testing purposes, also add EnableVerboseAvayaSnmpLogging="true"
When you're done, the Tapi config area should look like this.
<?xml version="1.0" encoding="utf-8"?>
<Tapi
SNMPServerIPAddress="192.168.253.99"
EnableVerboseAvayaSnmpLogging="true"
/>
Note that the IP address should be the same as the IP address you put in the Services area of the QMS configuation. See section 2.2 above.
Restart the CallRecording Service.
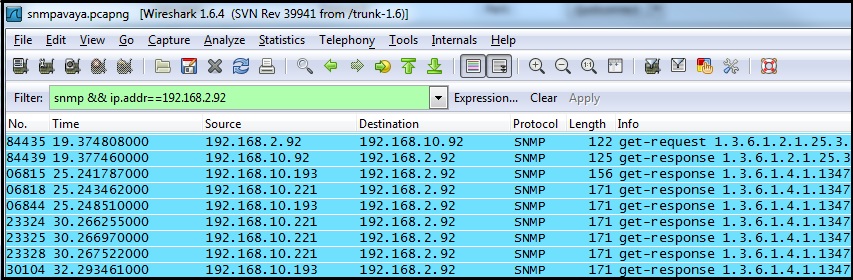
6.1 Verify that the Avaya and QMS service are exchanging SNMP traffic. Use wireshark to capture the traffic on the LAN. Filter on SNMP. You should see a 'get-request' packet from the IP address of the QMS Server to the IP address of the Avaya Server. You should also see a series of 'get-response' packets from the IP address of the Avaya server to the IP address of the QMS Server. You must see both a request and response as an indication that the Avaya PBX and QMS are exchanging information.
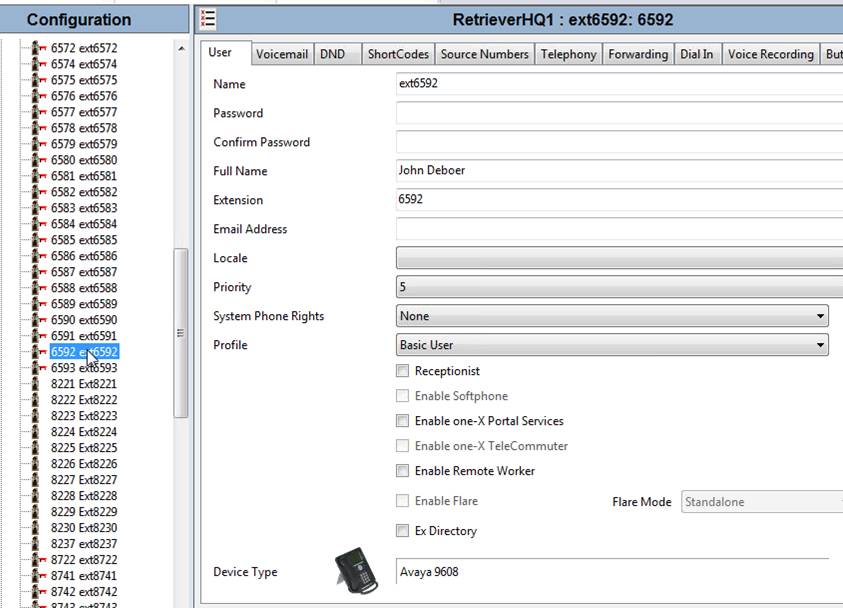
6.2 You must also enter the correct Agent ID info for each user that you create in the QMS Server, User Section. Note that the AgentID box is red. This is a required field when integrating with Avaya.

There have been problems, where customers have provided the wrong AgentID information. You can verify the correct Agent ID info by looking in the QMS Recording Service's ConsolidatedCallRecording log. QMS actually builds a user list by querying the Avaya via an snmp request. The actual AgentID information as it exists in the Avaya PBX user setup can be seen to the far right of the log lines you see below.
[AvayaIPOfficeDHCPManager.BuildCompleteUserAddressMap]:
================================================================================
00:00:24.8 DEBUG
[AvayaIPOfficeDHCPManager.BuildCompleteUserAddressMap]: Processing 20 snmp
User-Name query results...
00:00:24.8 DEBUG
[AvayaIPOfficeDHCPManager.BuildCompleteUserAddressMap]:
1.3.6.1.4.1.6889.2.2.1.1.1.1.1.2.1.4.1: OctetString AValentine
00:00:24.8 DEBUG
[AvayaIPOfficeDHCPManager.BuildCompleteUserAddressMap]:
1.3.6.1.4.1.6889.2.2.1.1.1.1.1.2.1.4.2: OctetString CTomaszewski
00:00:24.8 DEBUG
[AvayaIPOfficeDHCPManager.BuildCompleteUserAddressMap]:
1.3.6.1.4.1.6889.2.2.1.1.1.1.1.2.1.4.3: OctetString AJones
00:00:24.8 DEBUG
[AvayaIPOfficeDHCPManager.BuildCompleteUserAddressMap]:
1.3.6.1.4.1.6889.2.2.1.1.1.1.1.2.1.4.4: OctetString SBorges
00:00:24.8 DEBUG
[AvayaIPOfficeDHCPManager.BuildCompleteUserAddressMap]:
1.3.6.1.4.1.6889.2.2.1.1.1.1.1.2.1.4.5: OctetString AReed
00:00:24.8 DEBUG
[AvayaIPOfficeDHCPManager.BuildCompleteUserAddressMap]:
1.3.6.1.4.1.6889.2.2.1.1.1.1.1.2.1.4.6: OctetString ABoonjathai
00:00:24.8 DEBUG
[AvayaIPOfficeDHCPManager.BuildCompleteUserAddressMap]:
1.3.6.1.4.1.6889.2.2.1.1.1.1.1.2.1.4.7: OctetString RLippitt
00:00:24.8 DEBUG
[AvayaIPOfficeDHCPManager.BuildCompleteUserAddressMap]:
1.3.6.1.4.1.6889.2.2.1.1.1.1.1.2.1.4.8: OctetString KThornton
00:00:24.8 DEBUG
[AvayaIPOfficeDHCPManager.BuildCompleteUserAddressMap]:
1.3.6.1.4.1.6889.2.2.1.1.1.1.1.2.1.4.9: OctetString WTaylor
00:00:24.8 DEBUG
[AvayaIPOfficeDHCPManager.BuildCompleteUserAddressMap]:
1.3.6.1.4.1.6889.2.2.1.1.1.1.1.2.1.4.10: OctetString AWojnar
00:00:24.8 DEBUG
[AvayaIPOfficeDHCPManager.BuildCompleteUserAddressMap]:
1.3.6.1.4.1.6889.2.2.1.1.1.1.1.2.1.4.11: OctetString KMcNeff
You can also check for the correct Agent ID in the Avaya User Setup screen. The correct Agent ID is what you see in the Name field. This must match exactly with the Agent ID filed in the User setup screen in QMS.
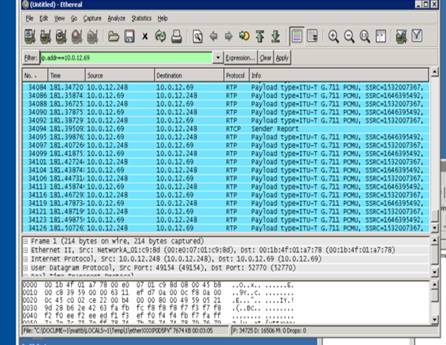
11. After configuring a user, make a test call. Have Etheral or
WireShark capturing the Sniffing port. You will see a standard RTP capture
with Codec Info displayed
12. TroubleShooting
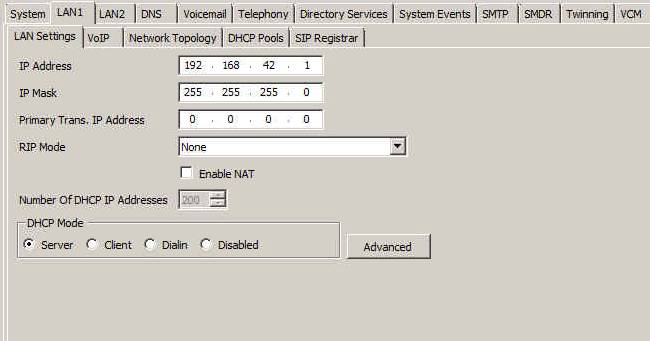
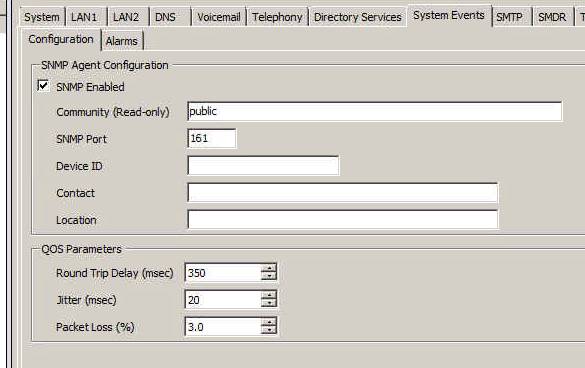
12.1 The IP address used in QMS Services PBX IP address can be found here on the Avaya Server Edition, System settings. Use LAN1 as this is where the Tapi connection will come from and it is also the IP address used by the SNMP process within QMS.
12.2 The SNMP is enabled and setup under the System Events Tab. Two very important things to notice.
12.2.1 Under the Community (Read-only) enter the word "public" in all lower case letters. This field is case sensitive.
12.2.2 The SNMP port must be 161
12.3 If you do see good snmp communication in the wireshark capture (see section 6.1) but the User's IP address is not getting populated and the Agent ID's do not show up in the logs;
Example of Log with missing Agent ID information.
[AvayaIPOfficeDHCPManager.BuildCompleteUserAddressMap]:
================================================================================
00:00:24.8 DEBUG
[AvayaIPOfficeDHCPManager.BuildCompleteUserAddressMap]: Processing 20 snmp
User-Name query results...
00:00:24.8 DEBUG
[AvayaIPOfficeDHCPManager.BuildCompleteUserAddressMap]:
1.3.6.1.4.1.6889.2.2.1.1.1.1.1.2.1.4.1:
00:00:24.8 DEBUG
[AvayaIPOfficeDHCPManager.BuildCompleteUserAddressMap]:
1.3.6.1.4.1.6889.2.2.1.1.1.1.1.2.1.4.2:
00:00:24.8 DEBUG
[AvayaIPOfficeDHCPManager.BuildCompleteUserAddressMap]:
1.3.6.1.4.1.6889.2.2.1.1.1.1.1.2.1.4.3:
00:00:24.8 DEBUG
[AvayaIPOfficeDHCPManager.BuildCompleteUserAddressMap]:
1.3.6.1.4.1.6889.2.2.1.1.1.1.1.2.1.4.4:
00:00:24.8 DEBUG
[AvayaIPOfficeDHCPManager.BuildCompleteUserAddressMap]:
1.3.6.1.4.1.6889.2.2.1.1.1.1.1.2.1.4.5:
Example of Log with the correct Agent ID information.
[AvayaIPOfficeDHCPManager.BuildCompleteUserAddressMap]:
================================================================================
00:00:24.8 DEBUG
[AvayaIPOfficeDHCPManager.BuildCompleteUserAddressMap]: Processing 20 snmp
User-Name query results...
00:00:24.8 DEBUG
[AvayaIPOfficeDHCPManager.BuildCompleteUserAddressMap]:
1.3.6.1.4.1.6889.2.2.1.1.1.1.1.2.1.4.1: OctetString AValentine
00:00:24.8 DEBUG
[AvayaIPOfficeDHCPManager.BuildCompleteUserAddressMap]:
1.3.6.1.4.1.6889.2.2.1.1.1.1.1.2.1.4.2: OctetString CTomaszewski
00:00:24.8 DEBUG
[AvayaIPOfficeDHCPManager.BuildCompleteUserAddressMap]:
1.3.6.1.4.1.6889.2.2.1.1.1.1.1.2.1.4.3: OctetString AJones
00:00:24.8 DEBUG
[AvayaIPOfficeDHCPManager.BuildCompleteUserAddressMap]:
1.3.6.1.4.1.6889.2.2.1.1.1.1.1.2.1.4.4: OctetString SBorges
00:00:24.8 DEBUG
[AvayaIPOfficeDHCPManager.BuildCompleteUserAddressMap]:
1.3.6.1.4.1.6889.2.2.1.1.1.1.1.2.1.4.5: OctetString AReed
To correct this problem, you should try to change the snmp version by editing the CallRecordingService.exe.config file. In the Tapi area of the config file, add the line "EnableVersion1SnmpGetNext". It would look like this.
<Tapi EnableVersion1SnmpGetNext="true" SNMPServerIPAddress="192.168.253.99" EnableVerboseAvayaSnmpLogging="false" />
12.4 If you are missing the RTP Stream for some calls, have the customer make sure that the "Allow Direct Media Path" is turned off. If you have it turned on, the rtp stream might bypass the mirrored port.